
HTTP/2 is a game-changer in web protocol technology, offering significant improvements in speed, efficiency, and security over its predecessor, HTTP/1.1. With features like multiplexing, header compression, and server push, HTTP/2 can drastically reduce web page load times and enhance the overall user experience. Additionally, HTTP/2 is enabled by default for Sucuri’s Web Application Firewall (WAF), making it even easier to leverage these benefits right out of the box.
In this blog, we’ll demystify HTTP/2 and guide you through the process of enabling it on your server using common control panels like Plesk and cPanel. We’ll break down the steps, providing detailed instructions and important notes to ensure a smooth transition. Let’s get started!
What is HTTP/2?
To understand better, it’s worth noting its origins. HTTP/2, a major revision of the HTTP network protocol, was officially approved in 2015. Based on Google’s SPDY protocol, it is designed to improve the speed, efficiency, and security of data transfer between a client and server.
If you can believe it, the original HTTP/1.1 was standardized all the way back in 1997! The web has come a long way since then, and HTTP/2 addresses many of the performance limitations of its predecessor.
HTTP/2 vs. HTTP/1.1
Understanding the differences between HTTP/2 and HTTP/1.1 can highlight why the newer protocol is so beneficial.
Connection management
- HTTP/1.1: Uses a single connection per request-response pair. This means that for each resource (like images, scripts, and stylesheets), a new connection must be established, leading to inefficiencies and increased latency.
- HTTP/2: Utilizes a single connection for multiple streams, allowing for multiple requests and responses to be sent simultaneously over one connection. This multiplexing reduces the overhead and latency associated with establishing multiple connections.
Header compression
- HTTP/1.1: Headers are sent as plain text, which can become quite large and add significant overhead, especially with repeated requests.
- HTTP/2: Implements header compression using the HPACK algorithm, reducing the size of headers and thus the amount of data that needs to be transferred.
Data format
- HTTP/1.1: Uses a text-based format, which is less efficient and more prone to errors during parsing.
- HTTP/2: Adopts a binary format, which is more efficient for both transmission and parsing, reducing the likelihood of errors.
Server push
- HTTP/1.1: The server can only respond to requests made by the client, which means the client must always initiate requests for resources.
- HTTP/2: Introduces server push, allowing the server to send resources to the client proactively before they are requested, reducing load times for web pages by preloading critical resources.
The need for HTTP/2
With the growing complexity of web applications and user expectations for instant access, the need for a more efficient protocol became apparent. HTTP/2 offers several enhancements over HTTP/1.1.
Growing complexity of web content
Websites today are far more complex than they were in the late 1990s. Modern web pages often include numerous resources such as images, JavaScript files, CSS stylesheets, and more. Each of these resources requires a separate request, and with HTTP/1.1, this can lead to significant inefficiencies and delays.
Performance bottlenecks
HTTP/1.1’s request-response model can quickly become a bottleneck, especially on mobile networks or in high-latency environments. The need for multiple connections and the overhead of large headers can slow down page loads, frustrating users and potentially driving them away.
Enhanced security requirements
Security is a top priority for web users and developers alike. HTTP/2 requires the use of SSL/TLS, ensuring that data is encrypted during transmission. This not only enhances security but also helps build user trust.
Improved user experience
In an era where milliseconds count, improving load times can significantly enhance user experience. Faster websites lead to higher user engagement, better search engine rankings, and increased conversions. HTTP/2’s features, such as multiplexing and server push, are key to achieving these performance gains.
Adoption and future-proofing
Many major browsers and web servers already support HTTP/2, and its adoption is steadily increasing. Implementing HTTP/2 ensures that your website is future-proof and can take advantage of ongoing advancements in web technologies.
Key features and benefits of HTTP/2
- Multiplexing: Multiple requests and responses can be sent simultaneously over a single connection.
- Header compression: Reduces the overhead of HTTP headers, improving performance.
- Server push: Allows servers to send resources to the client before they are requested.
- Binary protocol: Unlike the text-based HTTP/1.1, HTTP/2 uses a binary format, which is more efficient to parse and less error-prone.
Start using HTTP/2
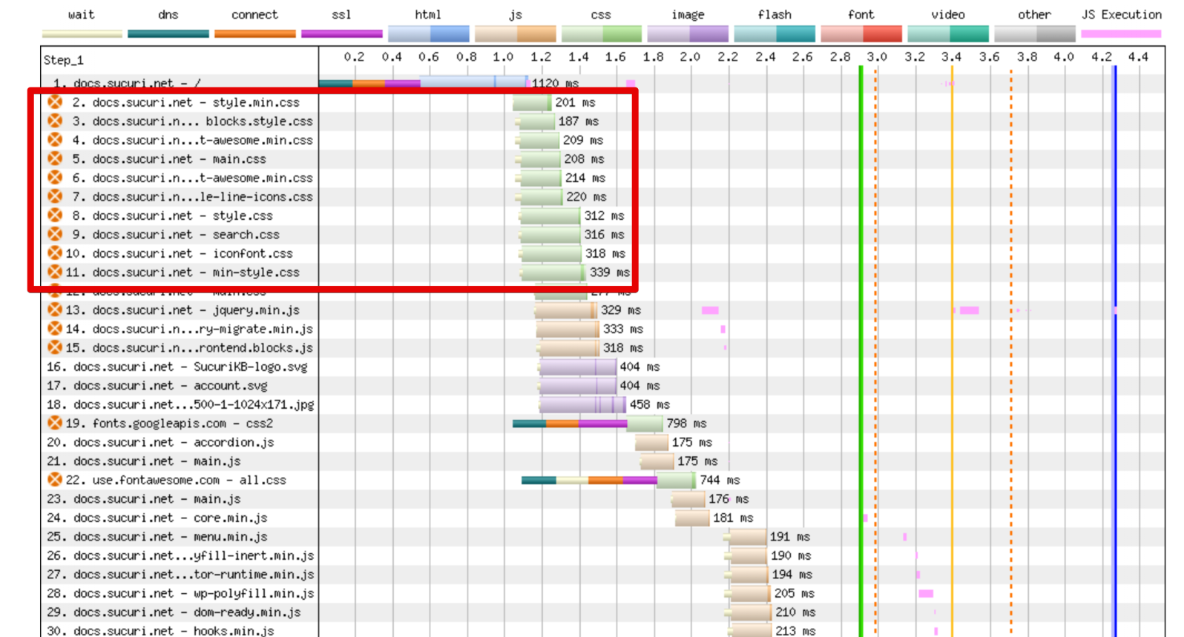
Before enabling HTTP/2, run a performance test on WebPageTest.org. Save the results – we’ll revisit them soon.
Plesk
- Log in to Plesk.
- Go to Tools & Settings > Updates and Upgrades to update Plesk and server packages.
- Verify that your server meets the requirements for HTTP/2 (Apache with nginx as a reverse proxy or Apache with mod_http2 module).
- Go to Tools & Settings > Apache Web Server and check the box to enable HTTP/2 support.
- Ensure nginx is configured to work with HTTP/2 if used as a reverse proxy, or ensure the mod_http2 module is enabled for Apache.
- Go to Websites & Domains > [select your domain] > SSL/TLS Certificates to install or verify a valid SSL certificate.
- Test HTTP/2 support using online tools like KeyCDN HTTP/2 Test or SSL Labs.
- Go to Tools & Settings > Services Management and restart Apache and nginx services.
Optional: Enabling HTTP/2 for specific domains
- Log in to Plesk.
- Go to Websites & Domains and select the domain.
- Click on Apache & nginx Settings.
- Enable Proxy mode, Smart static files processing, and HTTP/2 support.
- Click OK or Apply to save changes.
- Restart necessary services as described earlier.
cPanel
- Log in to WHM.
- Go to Home > cPanel > Upgrade to Latest Version to ensure cPanel is up to date.
- Go to Home > Software > Update Server Software and Home > Software > System Update to ensure all server packages are current.
- Navigate to Home > Software > EasyApache 4 and ensure EasyApache 4 is installed.
- In EasyApache 4, click Customize next to your current profile, go to the Apache Modules section, select the mod_http2 module, and click Provision.
- Go to Home > Service Configuration > Apache Configuration > Global Configuration and ensure the Protocols directive includes h2 and http/1.1.
- Go to Home > SSL/TLS > Manage SSL Hosts to install or verify valid SSL certificates for your domains.
- Go to Home > Restart Services > HTTP Server (Apache) and click Yes to restart Apache.
- Verify HTTP/2 support using online tools like KeyCDN HTTP/2 Test or SSL Labs.
Optional: Enabling HTTP/2 for specific domains
- Log in to cPanel.
- Go to Security > SSL/TLS and ensure a valid SSL certificate is installed for your domain.
- Verify HTTP/2 configuration for specific domains by checking the .htaccess file or any specific virtual host configurations.
Test HTTP/2 performance
Once you’ve enabled HTTP/2 on your server, you’ll want to verify that it’s working correctly and see the performance benefits in action. The tool we shared earlier, WebPageTest.org, is excellent for this purpose. It allows you to run detailed performance tests from multiple locations around the world using real browsers.
Compare these new results with the old ones. Look for improvements in load times, reduced latency, and more efficient resource loading.
Resources
For additional reading and video tutorials, check out the following resources:
Feel free to geek out on these topics, and don’t hesitate to reach out if you have any questions or need further assistance. Happy optimizing!