Due to its flexibility, ease of use, and massive plugin ecosystem, WordPress is a favorite among bloggers, developers, and businesses alike. Given its popularity, attackers do not waste time guessing where sensitive assets live. By default, on every WordPress site the front door is conveniently labeled /wp‐login.php or /wp‐admin/. On even a modest site, server logs can often reveal hundreds of failed logins coming from residential proxies and botnets that rotate addresses. Once a single credential is cracked an attacker could install a malicious plugin, add a backdoor, inject SEO spam, or turn the site into a drive-by malware host, damaging reputation, search rankings, and revenue in one hit.
How secure is the WordPress login page?
WordPress ships with essential security features right out of the box. Still, those built-in defenses often aren’t sufficient to stop persistent attackers. The default login page can be exposed to several threats, including:
For stronger protection, you’ll need to move past the defaults and add extra security layers.
10 defensive layers for WordPress login security
Below we’ll go over how attackers target the login page, then walk through some configurations that help close the most common gaps like strong credentials, two-factor authentication, rate limiting, and real-time monitoring.
- Use high-entropy passwords everywhere
- Move the login URL to a non-default path
- Enforce strict limits on failed logins
- Require 2FA for all privileged users
- Challenge suspicious sessions with CAPTCHA
- Harden wp-config.php against post-exploitation tampering
- Obscure author usernames from public view
- Remove dormant or unknown user accounts
- Purge unused plugins and themes
- Patch WordPress core, plugins, and themes immediately
1. Use high-entropy passwords everywhere
Threat context
Credential stuffing campaigns rely on the fact that users reuse passwords across services. Phishing kits and info-stealers dump millions of credentials daily. Attackers feed those lists into scripts that target /wp-login.php looking for credential matches.

Protective actions
- Generate passwords of at least 16 random characters. Passphrases are fine if the total entropy is comparable (for example, six random dictionary words separated by symbols).
- Store them in a reputable password manager. Browser autofill alone is insufficient because malware routinely extracts saved credentials.
- For service accounts, create unique API keys where possible instead of shared passwords.
- Audit the server for configuration files containing plaintext passwords and remove them.
Verification
Run the following on Linux to identify hard-coded passwords:
sudo grep -Eai 'pass(word)?\s*=\s*["'\''][^"'\'']{0,11}' -R /var/www/htmlIf anything shows up, change it immediately and replace the hard-coded password in the source file/config with an environment variable or pull from a secrets manager.
Common pitfalls
- Do not rely on simple substitutions (P@ssw0rd! is not safer than Password1!).
- Avoid baseline policies that cap passwords at twelve characters. Instead, raise the limit.
2. Move the login URL to a non-default path
Threat context
Commodity scanners are designed to check the default login paths, so use a non‑default path to reduce exposure to scanners that only look for defaults. It doesn’t stop a targeted attacker, but it filters out a massive wave of commoditized scanners.
Protective actions
Option A: Sucuri Website Firewall
- Log in to your Sucuri dashboard.
- Select Firewall > Access Control > Protected Pages.
- Add
/wp-login.phpand/wp-admin/and set the rule to Block or CAPTCHA. - Add a new custom path such as
/private-console/and allow it from the public internet.
Option B: WPS Hide Login plugin
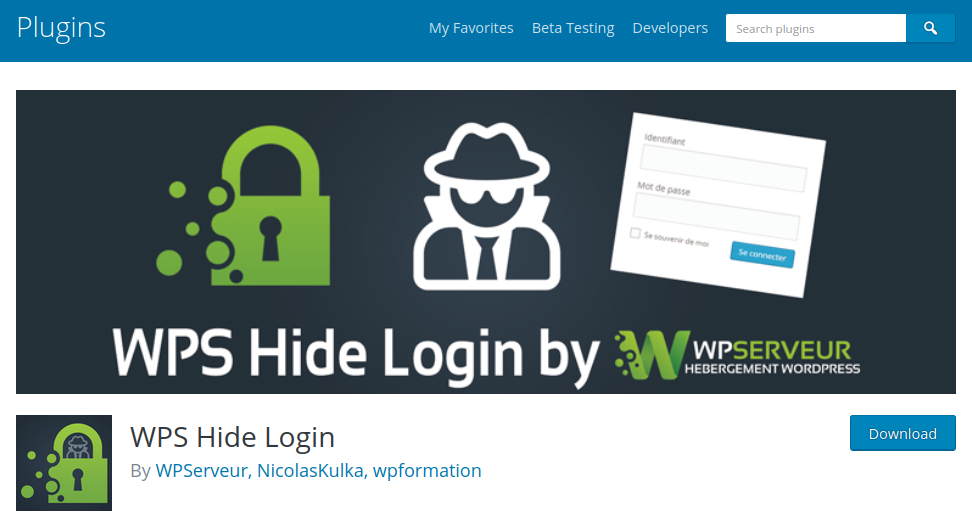
- Install WPS Hide Login from the official repository.
- Under Settings > WPS Hide Login, specify the new slug (example:
/secure-gateway/). - Save changes and record the new URL in your password manager.
Option C: Manual rewrite rule (Nginx sample)
location /wp-login.php {
   return 404;
}
location /secure-gateway {
   include fastcgi_params;
   fastcgi_pass unix:/run/php/php8.2-fpm.sock;
   fastcgi_param SCRIPT_FILENAME $document_root/wp-login.php;
}
Verification
Request /wp-login.php in a private browser window. A 404 or 403 response means the default path is hidden. Check that /secure-gateway loads the expected login form.
Common pitfalls
- Do not publish the new path in public documentation or support forums.
- Keep a second administrator account that bypasses the plugin in case the rewrite rule is misconfigured.
3. Enforce strict limits on failed logins
Threat context
Readily available brute force tools can cycle through password guesses in rapid succession, especially when the site replies quickly.
Protective actions
Firewall method (recommended)
The Sucuri Website Firewall automatically profiles failed logins and blocks IPs or entire ASNs that cross the threshold of failed attempts. Sucuri firewall users can review further hardening options and which directories or files they apply to under Security > Hardening.
Plugin method
- Install Limit Login Attempts Reloaded.
- Configure:
- Allowed retries: 3
- Lockout length: 30 minutes
- Max lockouts: 4
- Extended lockout: 24 hours
- Enable GDPR compliant logging to capture IP, username, time.
Server method (fail2ban sample)
On Ubuntu:
sudo apt install fail2ban
cat << 'EOF' | sudo tee /etc/fail2ban/filter.d/wp-login.conf
[Definition]
failregex = <HOST> .* "POST /wp-login.php
EOF

cat << 'EOF' | sudo tee /etc/fail2ban/jail.d/wp-login.local
[wp-login]
enabled = true
port = http,https
filter = wp-login
logpath = /var/log/nginx/access.log
findtime = 600
maxretry = 3
bantime = 86400
EOF
sudo systemctl restart fail2ban
Verification
Intentionally fail four logins and confirm the IP is blocked at the firewall or server level.
Common pitfalls
- Do not set a ban window shorter than the botnet rotation cycle.
- Monitor for false positives when legitimate users mistype passwords.
4. Require 2FA for all privileged users
Threat context
Phishing and malware steal passwords every day. Without a second verification factor, those credentials are enough.
Protective actions
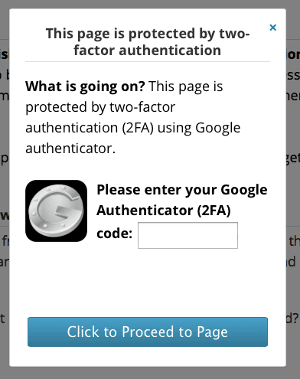
Sucuri method
- Log in to your Sucuri dashboard.
- Go to Firewall > Access Control > Protected Pages.
- Add
/secure-gateway/or/wp-login.php. - Select “Two Factor Authentication”.
- Add the admin email addresses. Each login will prompt for a time-based code delivered by email or an authenticator app.
Plugin method
- Install miniOrange 2FA or similar.
- Require 2FA for every role above Subscriber.
- Provide backup recovery codes and train staff.
Verification
Log in, skip the 2FA step, and confirm access is denied. Use Google Authenticator or Microsoft Authenticator to approve a token and confirm success.
Common pitfalls
- SMS codes are vulnerable to SIM swap attacks, so prefer TOTP apps or hardware keys.
- Enforce 2FA on XML-RPC (for mobile app logins) if that endpoint is required.
5. Challenge suspicious sessions with CAPTCHA
Threat context
Credential stuffing often originates from headless browsers or CURL. CAPTCHA blocks those automated runs with minimal friction to humans.
Protective actions
Sucuri Firewall method
- Log in to your Sucuri dashboard.
- Go to Firewall > Access Control > Protected Pages.
- Enter the path of the page you want to protect (e.g. /wp-login.php) and then select Captcha Challenge from the dropdown.
- Select Protect Page.
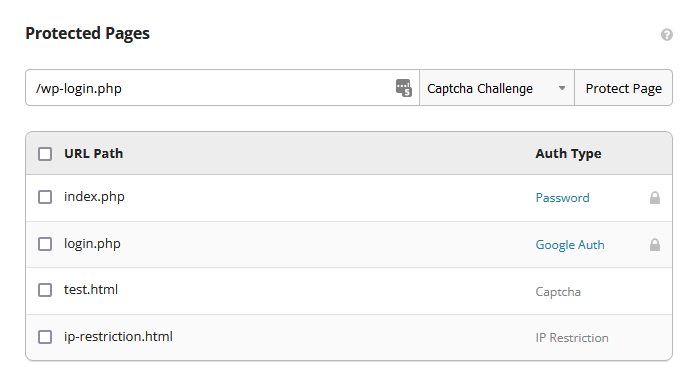
After you save the path, it’s added to your protected pages and will be secured from automated attacks by the Sucuri Firewall.
Plugin method
- Install CAPTCHA 4WP.
- Register reCAPTCHA v3 keys at https://www.google.com/recaptcha/admin.
- Apply challenges to login, registration, and password reset forms.
Verification
Use CURL to POST credentials. The response should return the CAPTCHA form rather than authenticating.
Common pitfalls
- Do not rely entirely on “invisible” CAPTCHA, combine it with rate-limits.
- Keep keys secure. Exposure allows attackers to proxy requests and bypass the check.
6. Harden wp-config.php against post-exploitation tampering
Threat context
If an attacker reaches the dashboard or gains file write access they can inject backdoors through the theme editor or plugin installers. Disabling those features forces attackers to find a server-side write primitive, raising the bar.
Protective actions
Add the following lines above /* That's all, stop editing! */
define('DISALLOW_FILE_EDIT', true);
define('DISALLOW_FILE_MODS', true);
Move wp-config.php one directory above the web root if your hosting provider allows:
/home/user/wp-config.php
/home/user/public_html/index.php
Set strict file permissions:
chmod 400 /home/user/wp-config.php
chown www-data:root /home/user/wp-config.php
Verification
- Dashboard should no longer show Appearance > Theme Editor.
- Attempt to install a new plugin and confirm the action is blocked.
Common pitfalls
- Remember to allowlist your own IP and temporarily disable
DISALLOW_FILE_MODSwhen a legitimate update from the dashboard is needed. - Test after core updates since custom file locations can break some managed hosts.
7. Obscure author usernames from public view
Threat context
Many automated tools run the enumeration scan /?author=1 which returns a redirect to /author/username/. That leak hands the attacker half the login puzzle.
Protective actions
Set a distinct display name
- Log in to your WordPress admin dashboard.
- Go to Users > Profile > Nickname field.
- Enter a friendly name.
- In the dropdown “Display name publicly as”, select that nickname.
Block author scans
Add the following to your .htaccess:
RewriteCond %{QUERY_STRING} author=\d
RewriteRule ^ /? [L,R=301]
Or configure the Sucuri firewall to block requests matching “author=” in the query string.
Verification
Visit /?author=1. Expect an instant redirect to the home page or a 403. Blog posts should show the nickname but not the actual login name.
Common pitfalls
- Changing only the nickname without blocking enumeration still leaks.
- Do not pick a nickname identical to the username.
8. Remove dormant or unknown user accounts
Threat context
Old contractors, ex-employees, test accounts, or compromised email addresses provide attackers with a foothold. Least privilege is a core security principle that unused accounts violate.
Protective actions
Manual audit
- Log in to your WordPress admin dashboard.
- Go to Users > All Users.
- Sort by Last Login date (install WP Last Login plugin for visibility).
- Export the list as backup.
- For each dormant account:
- Downgrade role to Subscriber temporarily.
- Notify the owner via their registered email.
- If no response within seven days, delete the user and reassign posts.
Automated policy with WP-CLI
wp user list --field=ID --role=author --field=user_registered | while read id; do
  last_login=$(wp user meta get $id last_login)
  if [ $(date -d "$last_login" +%s) -lt $(date -d '90 days ago' +%s) ]; then
    wp user delete $id --reassign=1 --yes
  fi
done
Verification
Run penetration testing scripts to verify no default usernames like admin, test, or demo are present.
Common pitfalls
- Delete only after verifying that the account’s email is not shared with a current employee.
- Reassign content, otherwise, media attachments may break.
9. Purge unused plugins and themes
Threat context
Serious vulnerabilities in plugins and themes are disclosed on a recurring basis. Keeping unused or outdated components installed increases risk even if they’re deactivated, as they can be executed directly via file inclusion.
Protective actions
Inventory
- Log in to your WordPress admin dashboard.
- Go to Dashboard > Plugins > Inactive.
- Review and remove any plugins you are no longer using.
Again, deactivating does not neutralize risk. Remove entirely unless needed for staging.
Delete with WP-CLI
wp plugin delete $(wp plugin list --status=inactive --field=name)
wp theme delete $(wp theme list --status=inactive --field=name)
Host-level whitelist
Lock wp-content/plugins/ to root:root and deny write via chmod 550 when no new installs are planned.
Verification
Scan the site with our SiteCheck remote scanner to verify no references to deleted plugins.
Common pitfalls
- Keep one default theme such as Twenty Twenty-Four for debugging but lock it at read-only permissions.
- Never use nulled or pirated plugins. In a recent threat report, we found that 36% of malware samples in our database for 2022 involved sites with at least 1 nulled plugin.
10. Patch WordPress core, plugins, and themes immediately
Threat context
Some vulnerabilities see broad exploitation soon after disclosure, but prompt patching shortens the time your site remains exposed. Apply fixes immediately and consider a web application firewall to reduce risk while you update.
Protective actions
Auto-update strategy
- Core: set
WP_AUTO_UPDATE_COREto minor. - Plugins and themes: enable auto-updates only for vendors with strong regression testing.
WP-CLI scheduled job
0 */4 * * * cd /var/www/html && wp plugin update --all --quiet >> /var/log/wp-updates.logThis cron job will auto-update all WordPress plugins every 4 hours and log the results.
Firewall virtual patching
The Sucuri Website Firewall blocks known exploit signatures even when the vulnerable code still exists. This buys the admin time to test updates in staging.
Verification
- Run
wp core verify-checksumsto ensure files are pristine.
Common pitfalls
- Relying only on hosting provider auto-updates. Always monitor for changes to WordPress core and any themes or plugins you’re using.
- Ignoring premium plugins that require manual download; set calendar reminders.
Bonus hardening tactics
HTTP basic authentication
Place an additional password at the web server layer, effectively requiring credentials before PHP executes. Example for Nginx:
auth_basic "Restricted";
auth_basic_user_file /etc/nginx/.htpasswd;
location /secure-gateway {
   # existing fastcgi config
}
IP allowlisting
Restrict wp-admin to a fixed office VPN range.
allow 203.0.113.15;
deny all;
Content Security Policy
Reduce the impact of XSS by limiting where scripts can load.
add_header Content-Security-Policy "default-src 'self'; frame-ancestors 'none';" always;Disable XML-RPC if unused
Attackers leverage xmlrpc.php for brute force multicall methods.
# Block xmlrpc.php requests
<Files xmlrpc.php>
order deny,allow
deny from all
allow from ALLOWED.IP.GOES.HERE
</Files>
Replace the ALLOWED.IP.GOES.HERE with the IP address you want to allow. If you want to disable XML-RPC requests entirely, you can remove this line.
Enforce least-privilege access
As touched on earlier, hand out permissions sparingly. Each account should get only the rights it needs to complete its tasks. No more, no less. If that account gets hijacked, the fallout stays contained.
WordPress offers these built-in roles:
- Administrator: Unrestricted control over site settings, plugin and theme installs, code edits, and user management.
- Editor: Can publish and manage any post, page, comment, category, or tag, but can’t alter site settings.
- Author: Publishes and maintains only their own posts and can upload media, yet can’t edit pages or other users’ content.
- Contributor: Can write posts but not publish them or upload media. An Editor or Administrator must approve the drafts.
- Subscriber: Limited to reading content and updating a personal profile. Perfect for membership or restricted-content sites.
Assign roles with care, and create custom roles with tailored permissions whenever the defaults don’t fit.
Lock Down WordPress Fast with Web Application Firewall Virtual Patching
If applying updates and patches right away is a challenge, a web application firewall can fill the gap. By adding virtual patches for known weaknesses, a WAF helps block familiar threats such as cross-site scripting and SQL injection.
Key takeaways and next steps
- Attackers focus on the WordPress login page because its location is predictable and single factor by default.
- Layered defenses like strong passwords, hidden URLs, rate limiting, two-factor authentication, CAPTCHA, configuration hardening, and strict patch management stop the overwhelming majority of real-world attacks.
- A Website Application Firewall accelerates the process by providing virtual patching and automated brute force protection out of the box.
- Regular backups remain the safety net when all other measures fail. If you do not have off-site daily backups, set them up now.
Locking down the WordPress login page is not a one-time project. Attack techniques evolve, infrastructure changes, and human habits shift. Effective defense therefore relies on continuous reinforcement.
If you need help hardening authentication or cleaning up after an intrusion, the Sucuri team is on call. Implement the steps above, validate them regularly, and keep the WordPress login page a silent guard rather than the weakest link in your security chain.