While working on or maintaining your WordPress website, you’ll inevitably encounter an error that prevents it from properly functioning. Knowing how to securely debug and troubleshoot WordPress is an exceptionally important skill. But there’s one important step you’ll want to take to prevent sensitive data exposure on your website.
In this article, we’ll explore how to securely check and debug errors on WordPress so you can quickly (and safely) spot problems on your site.
What is debugging in WordPress?
Debugging is defined as the act of finding and resolving bugs or errors – usually in your website’s code. As a final step, you’ll need to perform QA to test the code and ensure that it’s resolved on your site.
WordPress websites come bundled with a WordPress debug tool that makes it easy to see root causes for website errors – a feature known as WP_DEBUG. Let’s dive in to how it can lead to security issues and how to properly use it.
How WP_DEBUG can lead to security issues
If not performed correctly, debugging your website can inadvertently lead to sensitive data exposure on your website.
For example — you might encounter a situation where WordPress displays an Error page, sometimes referred to as a “White Screen of Death”. Naturally, you’ll want to troubleshoot the problem to figure out what is breaking the website and debug the issue.
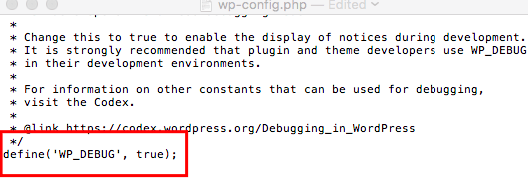
The conventional solution is to modify the wp-config.php file and change the following parameters to enable debugging in WordPress: define(‘WP_DEBUG’, true);
However, if you enable the debug log with this parameter, it will cause the errors to display on the website homepage for everyone. This exposes sensitive data about outdated software, location of files, PHP errors caused by plugins, themes, or custom code, and other sensitive information about your environment. And according the OWASP Top 10, this can be classified as a “Security Misconfiguration”.
“Error handling reveals stack traces or other overly informative error messages to users.”
As a result, it’s not recommended to use WP_DEBUG on a live website for this reason – it’s meant for local test environment or staging installations.
How to enable debugging on WordPress
If you need to enable debugging on a live website and you don’t have a test environment handy, WordPress allows us to enable debug mode on the website without displaying debug results publicly.
To activate secure debugging in WordPress, follow these instructions:
1. Open your wp-config.php file
Log in to your FTP account and search for wp-config.php in your root WordPress directory.
2. Check for WP_DEBUG
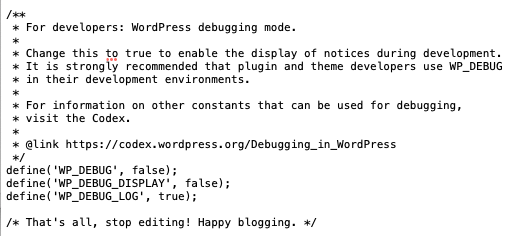
Navigate to the line in your wp-config file where WP_DEBUG has been defined. It is usually disabled and looks like this:
define('WP_DEBUG', false);
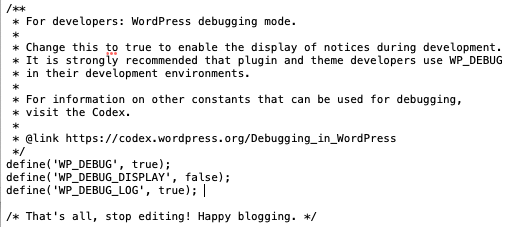
3. Replace WP_DEBUG with the following code:
define('WP_DEBUG', true);
define('WP_DEBUG_DISPLAY', false);
define('WP_DEBUG_LOG', true);
This essentially asks WordPress to log the errors to a debug log file and prohibits it from displaying on the webpages of your site.
The parameter define(‘WP_DEBUG_LOG’, true); creates a file debug.log in the ./wp-content directory. Furthermore, the format of this file is just like the error_log file so we can easily find what we need.
How can I check my WordPress debug mode results?
Once you’ve enabled secure debugging, you can check your WordPress debug log results in a few short steps:
- Navigate to /wp-content/
- Locate the debug.log file
- Analyze the contents for errors, warnings, and notifications.
You can download, view and edit this file at your leisure. It’s incredibly useful for reviewing debug results at a later date or viewing them via AJAX or wp-cron runs.
How do I disable the debug mode in WordPress?
As soon as you’re done troubleshooting or debugging your website errors, disable the debug mode by simply navigating back to your wp-config.php file and replacing define(‘WP_DEBUG’, true); with define(‘WP_DEBUG’, false);.
And next time, when you need to enable debug mode, simply change the value back from define(‘WP_DEBUG’, false); to define(‘WP_DEBUG’, true); and you’re all set.
Conclusion
Enabling WordPress Debug Mode can be incredibly useful for troubleshooting and identifying website errors. But it also exposes a website to security threats if not used properly. To avoid revealing sensitive information about your website’s environment, disable debugging from displaying error messages on the front-end of your WordPress environment.