The Sucuri Firewall functions as a reverse proxy. A simple change to your DNS settings is all it takes to thoroughly filter incoming traffic to sniff and parse out bad requests from the good ones. However, these DNS changes can affect connectivity to your mail service if not properly implemented.
In fact, this is a very common issue that is regularly raised with our support team. The Sucuri WAF is not designed to support or filter your email — and many users either intentionally or accidentally try to send email to the firewall for filtering, resulting in various problems.
For example, one very common scenario we see is this:
A website owner comes to us with an infected website. We clean the malware and enable the WAF to harden their environment and avoid re-infection. Suddenly, issues occur with inbound or outbound email delivery and troubleshooting ensues.
In this post, we’ll explain why mail server issues can arise after malware remediation and/or enabling the Sucuri WAF. We’ll also outline how to properly implement the web application firewall to resolve issues with your email.
Inbound email not getting through
The most common cause of inbound traffic not getting through is seen for domains using cPanel or Plesk and hosting email boxes alongside the webservice.
In these cases, the following DNS setup would be typical, with the MX record directive sending email to the website’s IP address:
example.com A 192.168.0.1 # where the IP is the website host IP
example.com MX example.com
When malware cleanup is complete and the firewall is enabled to filter malicious traffic, block known vulnerabilities, and prevent re-infection, DNS setup might look something like this.
example.com A 192.124.249.1 # where the IP is the WAF IP
example.com MX example.com
This scenario creates a conundrum for email, however. With this configuration, inbound email will now bounce back to the sender immediately.
To prevent issues, best practice dictates to always use a separate DNS A record for the server listed as the target in the MX record. So instead, the additional A record and corresponding MX record should look like this:
mail.example.com A 192.168.0.1 # where the IP is the host and email server IP
example.com MX mail.example.com
It is always a good practice to maintain separate hosting server services on separate A records — that includes FTP, IMAP, cPanel, and other services you may be using. Additionally, these should not be defined as CNAME records, and is in fact strongly discouraged for MX records in rfc1912 2.4.
Other reasons for inbound email issues
I have rarely encountered inbound email issues following infection caused by anything other than a DNS misconfiguration. Although, I have seen hosts block all ports to an infected server as part of their mitigation, you can test for connectivity issues using one of the following commands.
You can check if port 25 (inbound email) is open from a Mac terminal (Command + Space Bar or F4 then type terminal):
nc -vz mail.example.com 25On Windows, use a command prompt (Windows +X) with the following command::
telnet mail.example.com 25If at any point you see Connection refused as an output response, the mail service itself on the server is down. You’ll need to speak to your hosting provider to troubleshoot this issue further.
Enabling Telnet in Windows 11
Telnet is disabled by default for Windows 11 environments. You’ll need to enable this client application manually from the control panel to proceed.
- Click Start and launch the Control Panel.
- Click Programs.
- Select Turns Windows features on or off.
- Scroll down to the Telnet Client and tick the box.
- Click OK to save your changes.
How to fix issues with outbound emails
Issues with outbound email can be far more complex to debug, but we’ll break down a couple of important steps you can follow to troubleshoot the problem.
1 – Check for DNS problems
First, you’ll want to check your email client and sending server for DNS issues. Just like we saw with issues for incoming emails, if the WAF is enabled and you’ve set example.com as your SMTP email relay, you’ll get errors like: Failed to connect, retry.
To sidestep this problem, use a separate DNS A record for mail.domain.com to avoid issues. Otherwise, you’ll likely encounter emails stuck in your outbox.
mail.example.com A 192.168.0.1 # where the IP is the host and email server IP
example.com MX mail.example.com
2 – Review your email credentials
If your server and website were recently compromised, you likely would have changed all your credentials after the infection was cleaned up to help harden the environment against reinfection.
Confirm that there isn’t an issue with your email credentials and authentication is occurring as expected — otherwise, you’ll likely find emails are not being sent as expected. If the credentials are wrong, again, you will find your items stuck in the outbox rather than in sent items.
3 – Scan for blocklisting with MX Toolbox
You can check if your hosting server’s IP address is blocklisted with MX Toolbox.
Simply enter any IP address and click Blacklist Check. But be sure to: Email Blacklist Check – IP Blacklist Check – See if your server is blacklisted use the host IP address, not the domain name (if email is bouncing due to a blacklisted domain, it will be resolved as part of the malware remediation process).
If you see an RBL listing, that would be a cause of outbound email issues. But be sure to ignore any warnings from UCEPROTECT as they are a well-known scam who demand payment in order to be removed from their lists.
After malware removal — it’s important you don’t do it before — you can request any RBLs blocklisting your host IP to be removed, stating that the host is now clean. Any that ask for a fee for this service should be ignored.
4 – Investigate with your hosting provider
In some cases, your hosting provider may have disabled outbound emails from your server to prevent spam. As a result, email can become queued on your server — you may find emails bounce back to you after some predetermined time (usually a few days, but sometimes up to a week).
If this is the case, your hosting provider will expect assurances that any infection has been cleaned up before re-enabling this feature for your domain. So if you haven’t already yet, reach out to your host and let them know that you’ve resolved the malware issue in your environment.
5 – Generate SPF and DKIM records
To further improve deliverability, you should also ensure you have a good SPF and (if possible) DKIM and DMARK records.
An SPF TXT record is very important for email authentication, and also very easy to create. It includes a list of IP addresses and domains authorized to send emails from a specific domain.
To get started, you can use a tool such as Easy DMARC to generate an SPF record for your domain.
For instance, let’s walk through the steps of creating an SPF record for example.com.

To create an SPF record for your domain:
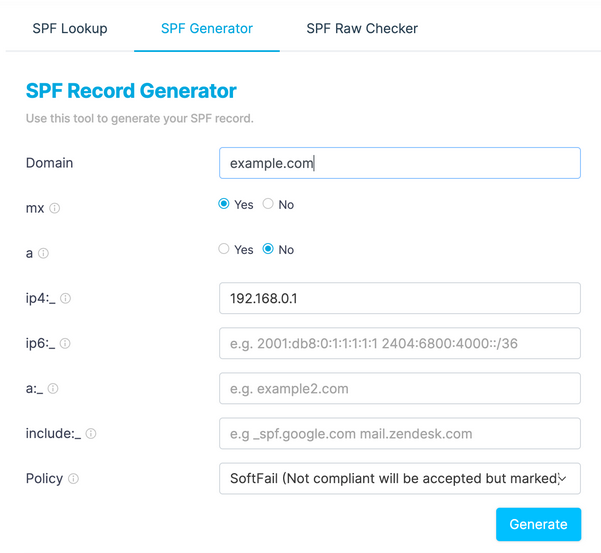
- Navigate to Easy DMARC’s SPF record generator.
- Enter your domain name.(ie. example.com)
- Select Yes for mx. This will allow servers listed as MX to send emails from the domain.
- Select No for a. This allows the current IP address of the domain to send an email for your domain.
- Define your hosting server’s IP4 or IP6 address (ie. 192.168.0.1).
- Define any other server IP addresses or services that should also be included in the record in the include section. For example, if you use Google services add _spf.googe.com.
- Set the policy to SoftFail unless you are confident that you have listed all servers and services, in which case you can use Fail.
The following SPF record will be generated for our specific example:
v=spf1 mx ip4:192.168.0.1 ~allThis DNS TXT record should be added to your domain. Some DNS management services also offer a specific SPF record, but these are now redundant — and despite the name, should still be added as a TXT record.
@ TXT IN 3600 “v=spf1 mx ip4:192.168.0.1 ~all”DKIM and DMARC records are also very effective in proving the legitimacy of your email. However, they need to be set up in conjunction with your hosting provider and are highly dependent on the architecture, and therefore can not be configured in DNS alone. Each host should have similar guidance, such as we have here for Godaddy on how to set up DKIM or DMARC records for email.
If you are self hosting on a Linux box, you will need to check your distributions support docs for instructions.
That didn’t work. Now what?
We’re always here to help field questions about malware, hacked websites, and anything related to our web application firewall.
So, if you’re suddenly experiencing issues with your mail server after a website compromise or enabling the WAF reach out to us via support ticket with the following details:
- What problems are you experiencing?
- Is there an issue with inbound or outbound mail?
- What do you have set in your email client as the sending server?
- Are emails bouncing? If so, what are the email headers for the bounced emails?
Here are some docs to help you pinpoint your email headers:
We’d be happy to investigate and help you resolve mail connectivity issues after cleaning up the infection and enabling the firewall.


