Encountering the ERR_TOO_MANY_REDIRECTS error (also called a redirect loop error) can be frustrating, especially when your website was working fine just moments ago. This issue is common across browsers such as Chrome, Firefox, and Edge and it typically means your site has entered a redirection loop.
In this post, you’ll learn what the error means, why it occurs, ways to identify where the redirect is coming from, and how to fix it effectively – including an important section on redirect types, which often play a direct role in causing this issue.
What is the “ERR_TOO_MANY_REDIRECTS” error?
The redirect loop error occurs when a browser tries to load a page but gets caught in an endless cycle of redirects. Instead of reaching the website, your browser keeps bouncing between different URLs until it stops trying. Essentially, the site tells the browser to go to another location repeatedly, causing an infinite loop. For Example:
- Your browser opens http://yourdomain.com
- It’s redirected to https://yourdomain.com
- Then redirected back to http://yourdomain.com
- Loop continues…
Error messages vary by browser:
- Google Chrome: This page isn’t working. example.com redirected you too many times.
ERR_TOO_MANY_REDIRECTS - Firefox: The page isn’t redirecting properly
- Safari: Too many redirects occurred trying to open the page
- Edge: This page isn’t working right now – redirected you too many times
Different types of redirects
Here are the most common redirect types used on websites:
301 Redirect (Permanent):
Indicates a page has been permanently moved to a new URL. For example, if you’ve changed your website’s address or renamed a page. This type is commonly used when moving a site from http:// to https:// or from a non-www to a www version. This tells browsers and search engines to always go to the new page and most of the SEO value from the old page is passed along.
302 Redirect (Temporary):
This type of redirect is used when you want to send visitors to a different page for a short time. For example, while your main page is under maintenance or you’re testing a new version of it. It tells browsers and search engines that the move isn’t permanent, so your original page stays listed in search results and keeps its ranking.
307 Redirect (Temporary / HSTS Redirect)
A modern version of the 302 redirect. It’s also a temporary redirect but ensures the type of request (like GET or POST) stays the same. This is important when someone is submitting a form or performing an action that shouldn’t change during the redirect.
Browsers also use an internal 307 redirect when HSTS (HTTP Strict Transport Security) is enabled. Once a browser has seen the HSTS header, it automatically upgrades all http:// requests to https:// before reaching the server, ensuring a secure connection.
308 Redirect (Permanent)
Similar to 301 redirect, this is for permanent moves. The difference is it also keeps the request type the same, which is useful for websites or APIs that need forms or data to be sent the same way after the move.
Client-Side Redirects
Client-side redirects are implemented using HTML or JavaScript, such as Meta Refresh tags or JavaScript window.location scripts. Unlike server-side redirects, they occur in the user’s browser after the page loads.
DNS Redirects and Domain Aliases
A DNS redirect sends a domain’s traffic to another server by changing DNS records like A or CNAME. Unlike HTTP redirects that occur after a browser connects to a web server, DNS redirects happen earlier when the domain is resolved to an IP address or alias.
A domain alias is different. It doesn’t redirect but lets multiple domain names show the same website. For example, example.net showing the same content as example.com. This is often used when a business wants several domains to open the same site.
There is some controversy around how domain aliases should be handled. While some setups rely solely on aliases to serve the same content under different domains, the simplest and most effective approach is to set up a 301 redirect from all extra domains to your main one. This way, all visitors and search engines land on the correct domain, your SEO strength stays combined, and there’s no mix-up or duplicate content between domains.
The Order in Which Redirects Happen
Not all redirects are treated equally – browsers follow them in a specific sequence and knowing this can help you understand why some redirects might behave differently than expected.
1) HTTP Redirects
HTTP status code redirects are executed first, before the page starts loading. These include server- or firewall-level redirects with status codes such as 301 (permanent), 302 (temporary), 307 (temporary), and 308 (permanent). They are commonly used for actions like moving from http:// to https://, switching between non-www and www domains or updating SEO-friendly URLs. For example, a 301 redirect can send http://example.com permanently to https://example.com.
2) HSTS (HTTP Strict Transport Security) Redirects
HSTS is a browser-enforced security policy that tells browsers to always use HTTPS for your domain. Once a browser receives the HSTS header, it automatically converts any future http:// requests to https:// before contacting the server.
Example header:
strict-transport-security: max-age=31536000Unlike standard HTTP redirects, HSTS redirects happen entirely in the browser and do not generate an HTTP status code. HSTS is particularly useful for preventing downgrade attacks and ensuring encrypted traffic.
3) JavaScript Redirects
JavaScript redirects are applied after any HTTP status code redirects but before the page fully renders. They are client-side redirects, executed in the visitor’s browser via a script. For example, a script might detect a visitor’s device and redirect them to https://m.example.com. Because the server has already responded with a 200 OK, no HTTP status code is involved. JavaScript redirects are often used for dynamic or conditional situations, such as sending mobile visitors to a mobile-friendly page or redirecting based on location.
How to Identify Where the Redirect Is Coming From Using cURL?
When troubleshooting website redirect issues, one of the most effective tools is cURL – a command-line utility that lets you inspect HTTP headers and responses in detail. Using cURL, you can determine whether a redirect is being handled by your origin server, CDN or firewall/WAF (e.g., Sucuri, Cloudflare, etc.).
1) Check the Initial Redirect
Start by checking your domain normally to see the first response and where it’s redirecting to:
curl -I http://example.comThe -I option fetches only the headers without downloading the body.
In the response, pay attention to two key headers: Location (where it’s redirecting to) and Server (which component is issuing the redirect).
Example Output:
HTTP/1.1 301 Moved Permanently
Location: https://example.com/
Server: Sucuri/Cloudproxy
In this example, the Location header shows the redirect target (https://example.com/). The Server header (Sucuri/Cloudproxy) indicates the redirect is being issued by the Sucuri Firewall, not your web server.
2) Test the Redirect from the Origin Server
If you suspect that the redirect may be configured on your web server instead of the firewall or CDN, you can test directly against your origin server’s IP address. To do this, send a request to the server’s IP, but include the Host header with your domain name. This tells the server which virtual host you’re querying.
curl -I http://23.192.228.20 -H "Host: example.com"Example Output:
HTTP/1.1 301 Moved Permanently
Location: https://example.com/
Server: Apache
The “301 Moved Permanently” response indicates a redirect is active at the origin server level, and the “Server: Apache” header confirms it’s being handled directly by your web server.
If instead you see a 200 OK response, it means your origin server is not redirecting. In that case, the redirect may be configured at an upstream layer – such as a CDN, load balancer or firewall.
Testing HTTPS Redirects Properly
When testing HTTPS redirects, you can’t simply cURL the IP address because the SSL/TLS handshake requires the correct SNI (Server Name Indication) to match your domain. If SNI doesn’t match, the server may present a certificate error or an incorrect virtual host response.
To test HTTPS redirection correctly, use cURL’s –resolve option:
curl -I https://example.com --resolve example.com:443:23.192.228.20This command:
- Connects directly to 23.192.228.20 (your origin IP).
- Sends the correct SNI and Host headers for example.com.
- Lets you verify whether the redirect is coming from the origin server.
If this request returns a 301 or 302 redirect, it confirms the redirect is configured on your origin server. If it returns 200 OK, the redirect is likely handled by another layer, such as a CDN or firewall.
How Many Redirects Should a Page Have?
Ideally, a page should have as few redirects as possible – one or two per request is generally safe. Each additional redirect increases page load time and can potentially confuse search engines, affecting SEO and indexing.
To maintain efficiency, ensure every old URL redirects directly to the final destination rather than passing through multiple intermediate pages. This approach improves site speed and makes it easier for search engines to crawl and index your content.
Common Causes of Redirect Loops
Several factors can lead to redirect loops. The most frequent causes include:
- Conflicting Redirect Rules (HTTPS/HTTP or WWW/Non-WWW): Mixed or overlapping redirects are the most frequent cause of this error.
- For example:
- One rule redirects example.com → www.example.com while another redirects www.example.com → example.com
- One rule redirects http:// → https:// while another redirects https:// → http://
These circular patterns create endless loops that prevent pages from loading.
- CMS Misconfiguration (WordPress, Joomla, etc.): Incorrect site URLs often trigger loops.
- Server-Level Rules: Duplicate/conflicting rules in .htaccess (Apache) or nginx.conf (Nginx).
- Conflicting Plugins or Extensions: SSL, redirect, caching, or security plugins/extensions may overlap.
- Conflicts with CDN, Proxy or Firewall Rules: A CDN, reverse proxy or firewall may enforce its own redirect rules. If these contradict your server or CMS settings, a redirect loop occurs.
- Expired or Corrupted Cookies: Old cookies may keep the loop going even after fixes.
Quick Checks Before Troubleshooting
Before diving deeper, try these quick steps:
- Open the site in a private/incognito browser window (or clear cookies) – sometimes stale cookies make the browser show the error even after the server is fixed.
- Clear any CDN or WAF cache (e.g., Sucuri, Cloudflare or others) along with your application cache.
- Disable HTTPS redirection in the Sucuri firewall dashboard → HTTPS/SSL → Protocol Redirection, then test the site.
If the site starts working after these steps, the issue was likely caused by cached redirects or cookies. If not, proceed with further troubleshooting.
How to Fix the Redirect Loop Error
Verify SSL on the Origin Server
Before adjusting firewall or CDN settings, make sure your SSL certificate is correctly installed on the origin server. This step is required whether your site is behind Sucuri Firewall alone or using Cloudflare CDN with Sucuri Firewall.
Run the following command (replace YOUR_SERVER_IP and YOURDOMAIN.COM):
echo | openssl s_client -connect YOUR_SERVER_IP:443 -servername YOURDOMAIN.COM 2>/dev/null | openssl x509 -noout -subjectUnderstanding the Results:
- If the output shows your domain:
subject=CN=yourdomain.comThis confirms SSL is installed on your origin server.
- If the output displays a different domain:
subject=CN=exampledomain.comThis indicates that no valid SSL certificate exists for your domain on the origin server.
Method 1) For Sites Behind Sucuri Firewall
Now that SSL status is verified, follow these steps to fix redirect loops for sites using Sucuri Firewall:
If SSL is installed on the host:
- In your Sucuri firewall dashboard → HTTPS/SSL, set SSL Mode to Full HTTPS.
- Clear the firewall cache and test the site in an incognito/private window.
If SSL is NOT installed on the host:
- In the Sucuri firewall dashboard → HTTPS/SSL settings, set SSL Mode to Partial HTTPS.
- Clear the firewall cache and test the site in an incognito/private window.
Method 2) For Sites Using Cloudflare CDN with Sucuri Firewall
After verifying SSL (see “Verify SSL on the Origin Server”), configure Cloudflare and Sucuri Firewall settings:
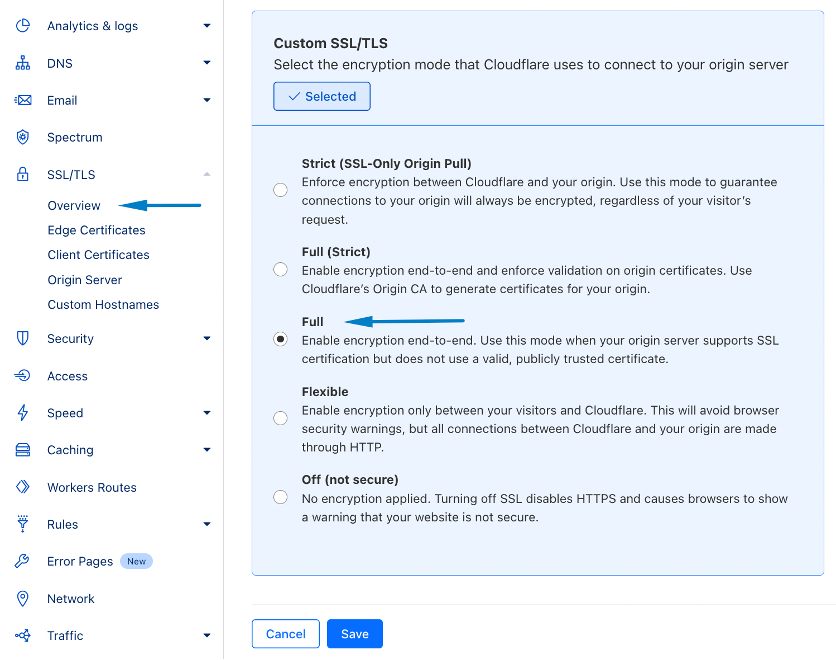
2.1 Cloudflare:
- Go to SSL/TLS → Overview
Set Encryption Mode to Full
2.2 Sucuri Firewall:
- If the origin server has SSL installed, set SSL Mode to Full HTTPS in the Sucuri dashboard → HTTPS/SSL settings.
- If there is no SSL installed on the origin server, set SSL Mode to Partial HTTPS.
- Clear the caches for Sucuri Firewall, Cloudflare, your browser, and any application-level caches (if any), then test your site.
Learn more about SSL modes here: https://docs.sucuri.net/website-firewall/configuration/ssl-mode/
If the redirect loop persists and your server doesn’t have SSL installed, choose one of the options below:
Option A: Install an SSL Certificate on the Origin Server
Work with your hosting provider or developer to install an SSL certificate on your origin server. Self-signed certificates are also acceptable. After installing the SSL, please follow these steps:
- Switch SSL Mode to Full HTTPS in the firewall dashboard under the HTTPS/SSL tab.
- Clear the firewall cache completely.
- Clear browser cache and retest the website.
Option B: Disable HTTPS redirection on the host
- Update wp-config.php: If you are using WordPress, add the following lines immediately after the <?php tag:
define('WP_HOME', 'http://yourdomain.com');
define('WP_SITEURL', 'http://yourdomain.com');
If these lines already exist, ensure they use HTTP instead of HTTPS.
- Check .htaccess: Look for redirect rules enforcing HTTPS and disable them by adding # at the beginning of the relevant lines:
# RewriteCond %{HTTPS} on
# RewriteRule ^(.*)$ http://%{HTTP_HOST}%{REQUEST_URI} [L,R=301]
- Plugins: Temporarily disable any SSL or HTTPS enforcement plugins. You can do this easily from your hosting control panel’s File Manager or by connecting via (S)FTP. Once connected, open the wp-content/plugins directory and rename the folder of the plugin you want to disable.
- Clear Cache: Clear the firewall and browser cache before testing the website.
Need help?
If you need assistance fixing redirect loop error or configuring your Sucuri Firewall, contact our support team. Our experts can guide you step by step and ensure your website runs smoothly.