WAFs (Web Application Firewalls) are nothing new as they used to primarily be deployed by large organizations. In today’s modern web however, they’re becoming increasingly common for the average site owner to deploy.
So what is a web application firewall exactly? To sum it up, it’s cloud-based protection that prevents sites from being hacked and infected. The Sucuri firewall is configured as a reverse proxy, examining all HTTP(s) requests before they reach the web server. On a fundamental level, it’s useful to have a “middle man” between the site visitor and the origin server to ensure nothing malicious gets through.
Without one, there’s nothing sitting between a potential attacker and the web application. They can send whatever requests they please, so it’s contingent upon the victim’s server to handle the malicious requests.
The WAF focuses on layer 7, the application. lt’s able to mitigate attacks by intercepting all incoming traffic and performing real-time analysis of all requests over HTTP/HTTPS protocols. It can be used to add extra security for websites and APIs by blocking irregular traffic through CAPTCHA tests to make sure the traffic is coming from a human and not a bot. Site owners can also customize certain rules such as allowed geo-locations, user agents, and IP addresses.
For more information regarding the differences between the layers, you can check out our previous post Network Firewall vs. Web Application Firewall (WAF).
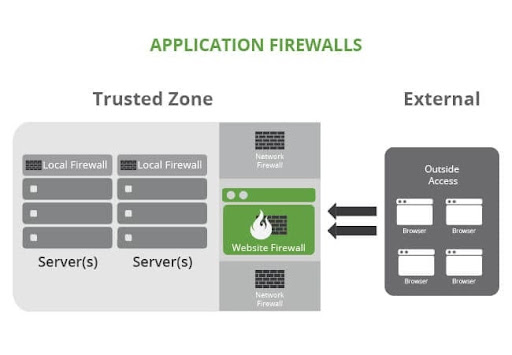
Here’s an illustration of how the Web Application Firewall works:
Why You Should Use a WAF
Website security should be a priority for any site owner as early and frequently as possible. With the amount of vulnerabilities and attacks that increasingly are occurring across the web, there’s always the chance that something may slip through the cracks.
With a firewall in place however, this significantly reduces the chances of this happening. Considering a lot of site owners do not have the time or resources to dedicate to having their own in-house security team, the most logical solution in this case would be placing the responsibility in the hands of professional security providers instead.
Having a middle man between the web application and visitor will be able to intercept anything of malicious nature before real damage takes place.
It’s important to note the difference between a plugin however, versus a full fledged firewall. While a plugin is able to monitor the site for any malicious activity, it’s not actually capable of blocking the attack before it happens.
How to Deploy a Web Application Firewall
In order to deploy a WAF you’ll first need to confirm where your DNS is managed. You can do this by doing a simple dig in terminal like the following:
$ dig yourdomain.com ns +shortIf this is a bit foreign however, you can also confirm using a site like whoishostingthis.com or who.is which will provide the Nameservers for you. Wherever your nameservers are pointing is where DNS will need to be updated, so in order to proceed, be sure to login to that account.
Once logged in, you’ll need to navigate to the DNS manager section of the account. If you’re unsure where this is located a hosting specialist should be able to assist. After accessing the DNS panel, you’ll want to update the primary A record (@) to the WAF IP address assigned, or you can update the Nameservers if you prefer DNS be managed somewhere different instead.
SSL issuance
In the case your site has an SSL certificate installed (HTTPS) you’ll want to make sure an SSL is installed on the firewall prior to activation, due to temporary downtime. If the firewall goes live without an SSL you may see a warning for up to a few hours that looks like that following:
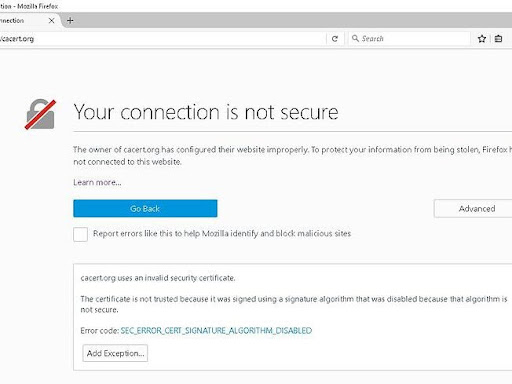
This warning may steer site visitors away, so it’s best to make sure an SSL is installed on the firewall side before any DNS changes are made. You can either upload your own SSL certificate to our WAF under the HTTPS/SSL section (copying and pasting the SSL certificate and Private Key), or you can request our free SSL be installed instead.
Testing a WAF before activation
Once an SSL certificate is installed, you can test how the site will appear behind the firewall prior to activation. In order to do this you’ll first want to edit your local host file. You’ll need to copy the current hosting IP, which can be found in the Hosting IP Address section on the firewall dashboard to the left.
Our guide for how to do this on Windows and Mac can be found here. After testing the site and confirming there’s no lingering timeout messages or SSL warnings, you’re all set! You can now update the DNS to point to the firewall.
In Conclusion
Learning about website security can sometimes feel tedious, but in order to build trust with consumers, improving site security posture remains important. As we continue to find vulnerabilities out in the wild, making sure a system is in place to patch things up before its exploited will help minimize security risks. Having a Firewall in place remains one of the most practical decisions you can make as a site owner.
I hope this has helped shed some insight into why a WAF is important, how it functions, and how one’s properly configured.