Navigating your WordPress site’s dashboard can provide you with significant control over your website’s functionality and appearance. Yet it won’t offer a direct interaction or management of your server. This is where Secure Shell Access (SSH) steps in.
SSH is a protocol that provides a secure and effective way to connect with your website and server to implement changes.
In this blog post, we’re going to delve deeper into what Secure Shell (SSH) is, how it operates, and why it’s useful. We’ll cover everything from the basics of connecting with SSH to common commands and best practices for ensuring secure communications and file transfers.
Contents:
- What is Secure Shell (SSH)?
- A brief history of SSH
- How do SSH public and private keys work?
- How to set up SSH and connect to your website (Windows)
- How to connect to your website via SSH (Linux & macOS)
- Controlling WordPress via SSH
- Common SSH commands
- SSH security best practices
What is Secure Shell (SSH)?
Secure Shell, or SSH for short, is a network communication protocol that provides a secure method for computers to communicate and exchange data over an unsecured network.
SSH uses cryptography to authenticate and encrypt connections, securing the communication between devices. It allows authorized users to remotely control servers and devices, execute commands, and transfer files — all while maintaining data integrity and confidentiality.
The secure shell protocol operates on a client-server model, similar to how a store owner might manage their store from afar through instructions to their employees. An SSH client initiates the connection, and upon successful authentication, the SSH server allows the client to execute commands and transfer data.
Strong encryption makes SSH suitable for use over unsecured networks. SSH is often used for managing infrastructure, controlling servers remotely, and securely transferring files. It also supports tunneling or port forwarding, allowing data packets to navigate across networks inaccessible otherwise.
Imagine you’re working remotely, tapping into the public Wi-Fi to remotely access your website’s server. Without SSH, your login details and all the data transferred could potentially be intercepted by anyone eavesdropping on the network. SSH steps in to act as a protective envelope, ensuring that your interactions remain confidential and shielded from prying eyes, even on a public network.
A brief history of SSH
Early internet protocols like Telnet and FTP primarily focused on connectivity. These protocols transferred data (including sensitive information like passwords) in plain text. This made it susceptible to ‘sniffing’ – a method where malicious actors could easily intercept and read the data being transmitted.
In 1995, after a password-sniffing attack at the Helsinki University of Technology, Tatu Ylönen quickly recognized the vulnerabilities in internet communications. To address this, Tatu developed SSH (Secure Shell), an encrypted protocol designed to safeguard data transfers, to ensure passwords and sensitive information weren’t exposed in plaintext. This innovation eventually evolved into an essential tool for secure communications on a global scale.
How do SSH public and private keys work?
SSH operates using a client-server model. When an SSH client wishes to establish a connection, it communicates securely with the SSH server. Before actual data communication begins, they undergo a handshake process to authenticate and establish encryption.
To achieve this, SSH makes use of public and private key pairs. When a user wants to access a server, they use their private key, which matches a public key stored on the server. If the keys match, access is granted.
Let’s take a look at the various phases.
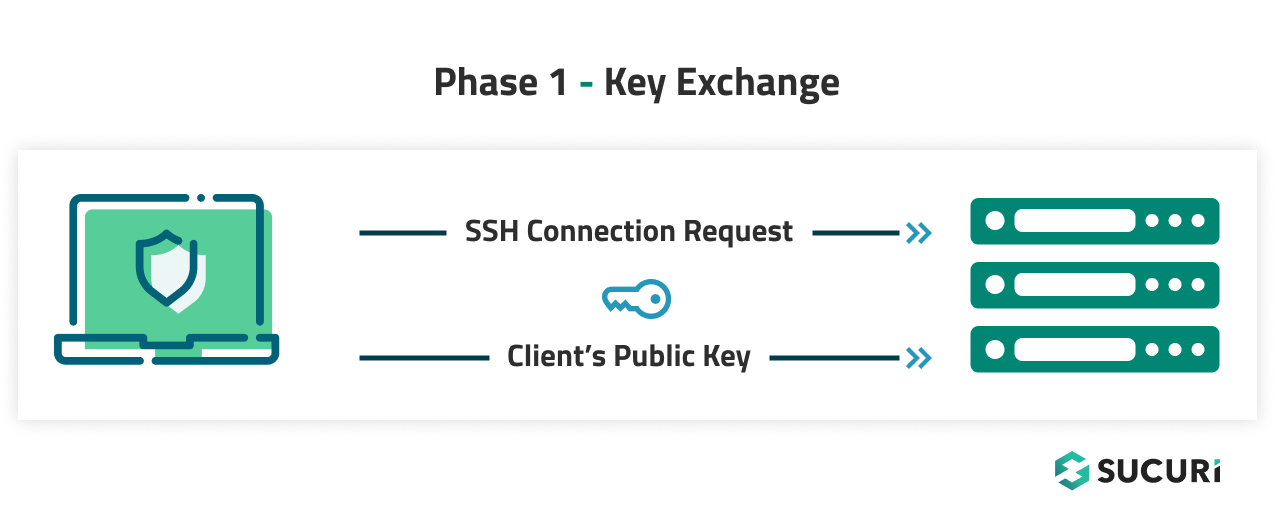
Phase 1 – Key Exchange
First, the client sends an SSH connection request to the server, along with the client’s public key.
 Phase 2 – Key Verification
On receiving the client’s public key, the server sends a random text to the client. The client then encrypts the random text using the private key and sends it to the server.
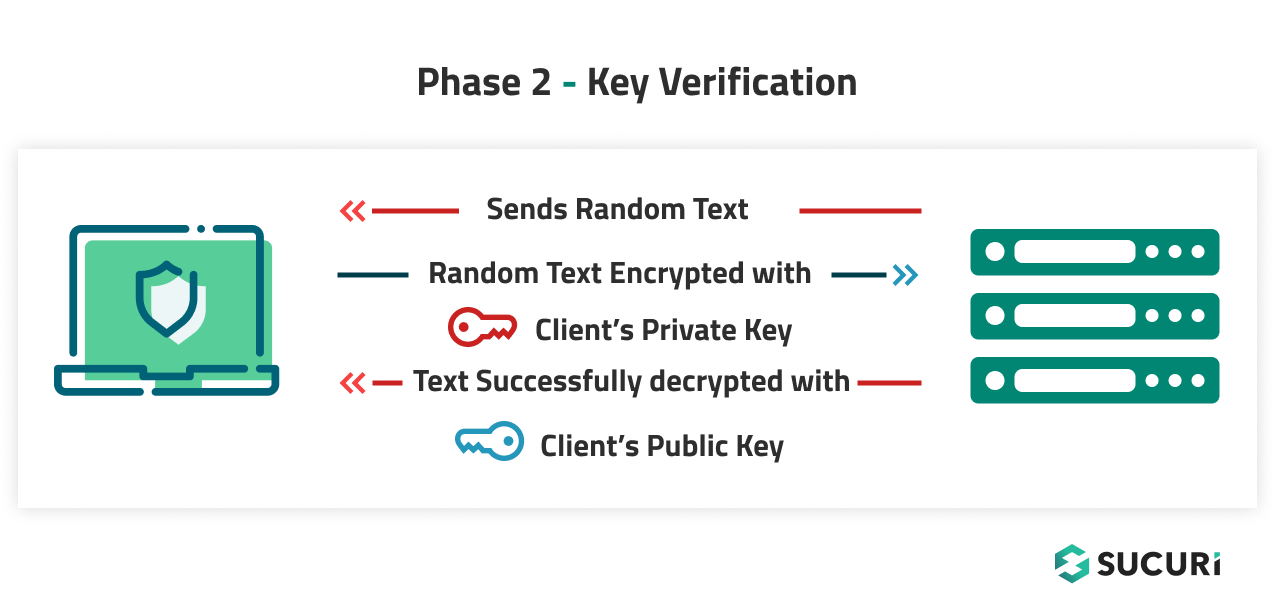 Since this is asymmetric key encryption, the server can now use the client’s public key to decrypt the received text. If the decrypted text matches the text that was sent by the server, the server confirms that it has the correct public key and sends an acknowledgement to the client.
Phase 3 – Data Transfer
Once the connection is authenticated, data transfer begins.
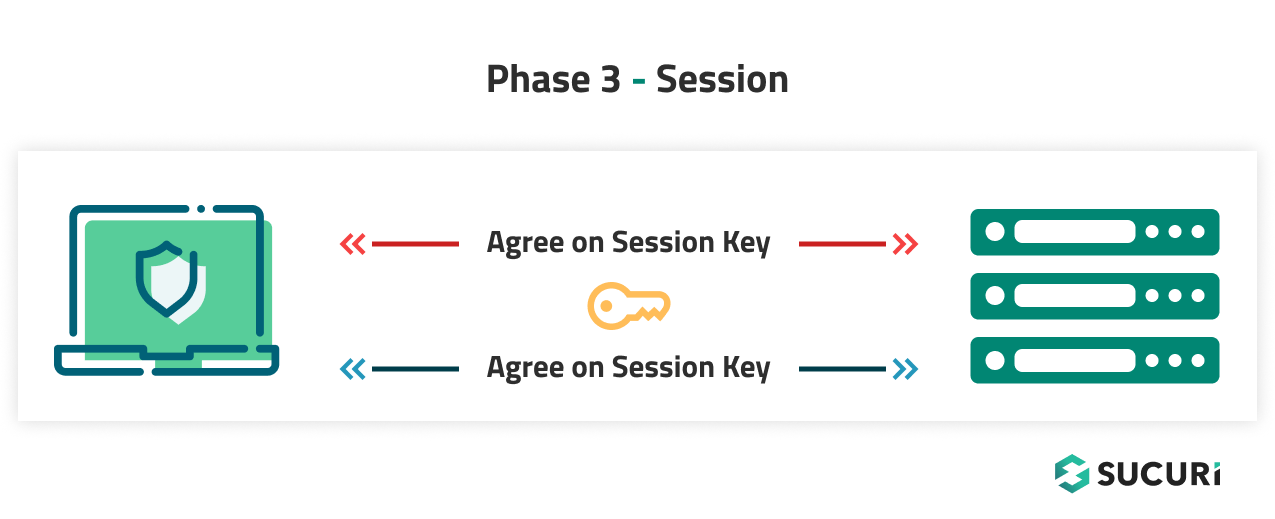 This data is encrypted using symmetric encryption. The client and the server share a single encryption key that is only valid for the specific session. Any data sent during this session is encrypted with this key, ensuring that even if someone intercepts the data, they cannot read it without the key.
Advantages of SSH over FTP
There are a few major advantages to using SSH instead of FTP, most of which are centered around website and server security.
- Encryption: SSH encrypts the data being sent over the network. This means your usernames, passwords, and any other sensitive information are secure.
- Authentication: SSH uses public and private key pairs for authentication, providing an additional layer of security compared to password-based FTP.
- Data Integrity: SSH ensures that the data sent or received remains unchanged during transit, protecting against tampering and corruption.
- Port Forwarding: SSH allows for secure port forwarding, enabling you to securely tunnel other protocols.
- Ease of Use: Modern SFTP (SSH File Transfer Protocol) clients have user-friendly interfaces, making the transition from FTP software seamless.
How to set up SSH and connect to your website (Windows)
Windows users can follow these step-by-step instructions to set up SSH and connect to your website:
Step 1: Download and install an SSH client
Windows users will need to use a command line application like Cmder or a dedicated SSH client to establish an SSH connection to the website. In this example, we’ll be using PuTTY.
To get started, download the latest version of PuTTY from its homepage and install it on your computer.
Step 2: Connect to your server using SSH
Open PuTTY, and it will prompt you to enter a host name and specify a port number. This is similar to how you would connect using FTP.
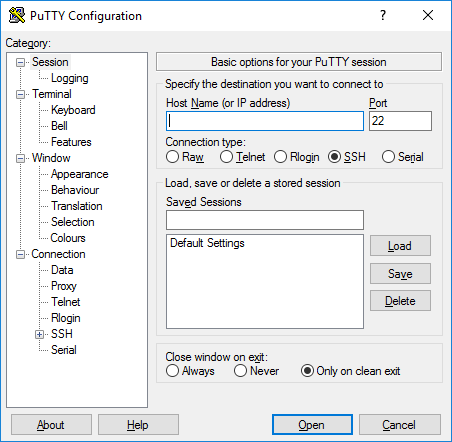
Enter the host or IP address of your server. The location of this information will vary based on your hosting provider, but many providers make it accessible through your control panel.
After entering the host name and port number in PuTTY then clicking Open, a command line will launch. Now, you’ll be prompted to enter your username and password. If they don’t work, check your hosting control panel for an SSH Access section for more detailed instructions.
Step 3: Interact with your server via the command line
The command line allows you to perform a variety of actions such as moving files, deleting folders, creating new directories, and changing user permissions with the appropriate commands.
For instance, after logging into your website’s server via SSH, you’ll be in the server’s root folder. To see what files and directories it contains, type ‘ls‘ and press Enter. Names in blue text are folders, while white text represents plain files.
To access a folder, use the following command:
cd directory_name
To return to your previous directory, type ‘cd‘ without any additions. As you get more comfortable with the command line, you can explore more advanced commands and functionalities.
How to connect to your website via SSH (Linux & macOS)
For MacOS or Linux users, you can simply use the command line to establish an SSH connection to your website.
Using the terminal shell, write the following command:
ssh exampleuser@yourserverip
You’ll need to replace exampleuser with your actual username and yourserverip with your shared or dedicated IP address to proceed.
Controlling WordPress via SSH
While the WordPress admin dashboard is user-friendly and packed with features, navigating through it can sometimes be a lengthy process. For a different way of managing your website, you might want to consider using the WordPress Command Line Interface (WP-CLI).
WP-CLI provides a highly efficient and robust solution for managing your WordPress installation. It lets you update your core files and plugins, set up multisite installations, and even back up your WordPress website.
With the official WP-CLI tool, you can directly interact with your WordPress environment using text commands. These commands are entered into a Secure Shell (SSH) window, which is connected to your website’s server.
WordPress users can check out our useful guide on how to connect to WordPress with SSH and WP-CLI for detailed instructions.
Common Secure Shell (SSH) Linux Commands
To help new users easily navigate their Linux server or VPS environments, we’ve compiled a list of some common SSH commands that you can use to perform tasks via the terminal shell.
| Secure Shell (SSH) Command | Description |
| cd | Changes the directory. Use this to navigate up or down a folder. |
| ls | Lists the names of files and directory contents. |
| mkdir | Creates a new folder or directory. |
| rm | Removes a file or directory |
| touch | Creates a new file. |
| cat | Shows the contents of a file. |
| pwd | Shows the full path to where you currently are in the website. |
| wget | Downloads files from the internet. |
| mv | Moves a file or folder. |
| cp | Copies a file or folder. |
| grep | Searches for a specific phrase in your files. |
| find | Searches for files and directories. |
| vi | Text editor that allows you to make changes to your files. |
| nano | Text editor that allows you to make changes to your files. |
| clear | Clears the terminal screen. |
| tar | Creates and unpacks compressed archives on your server. |
| history | Displays the last 50 commands used. |
| du | View the size of files and folders in a specific directory. |
| chown / chmod | Modify file and folder permissions. |
| zgrep | Searches for contents of a compressed file. |
| sudo | Elevates privilege to root. |
| su | Changes user. |
| dd | Copies raw data from one source to another. |
| scp | Securely transfers files between local and/or remote hosts. |
| curl | Enables data transfers and connections from a remote location. |
| man | Displays the user manual of any command in the terminal. |
SSH security best practices
There are a number of steps you can take to minimize risk for the SSH protocol and protect your Linux server or VPS environment.
- Change the default SSH port
- Enhance security with SSH key pairs
- Disable SSH root login on server
- Disable password-based logins
- Restrict SSH access using iptables
Change the default SSH port
To minimize potential automated attacks on your server, use a non-standard port for your SSH connection. This helps to reduce the likelihood of your server appearing on a hacker’s radar.
How to change the SSH port number:
- Connect to your server via SSH as usual.
- Switch to the root user using the ‘su’ command.
- Edit the sshd configuration file in the ‘etc/ssh/‘ directory using a text editor. Run ‘nano /etc/ssh/sshd_config‘ to edit the configuration file.
- Locate the line “Port 22” and change the port number to a different one of your choice.
- Exit the editor and save the changes.
- Restart the sshd service with ‘service sshd restart‘.
- Verify that the SSH is listening on the port you specified by connecting to it.
What is the SSH default port?
SSH can be used for secure port forwarding or tunneling, which allows secure transmission of data from a local port to a port on a remote server. By default, an SSH server listens to the standard Transmission Control Protocol (TCP) port 22.
Enhance security with SSH key pairs
SSH key pairs are one of the most secure methods for client-server authentication. To set up SSH keys, generate a key pair on the client computer used to connect to the server. After generating the key pair, place the public key on the desired server using the ‘ssh-copy-id’ tool.
How to generate private/public SSH key pairs in Windows
The PuTTY key generator makes it easy to generate public/private key pairs for Windows:
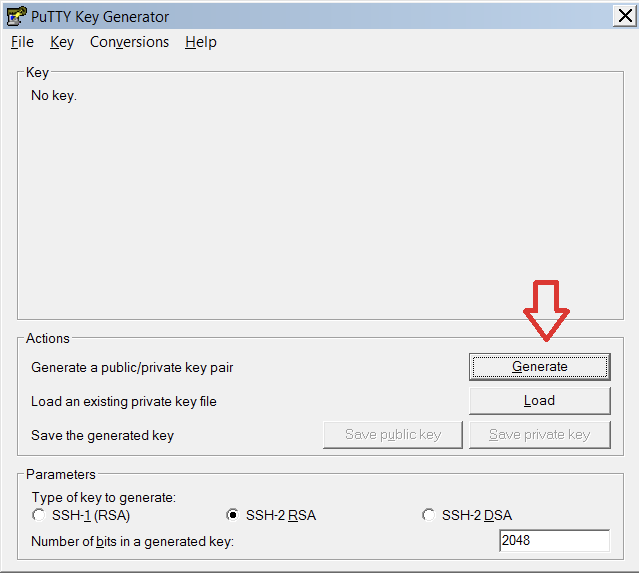
To get started, simply open the Putty Key Generator, then click on the Generate button to make a new public/private key pair for your use.
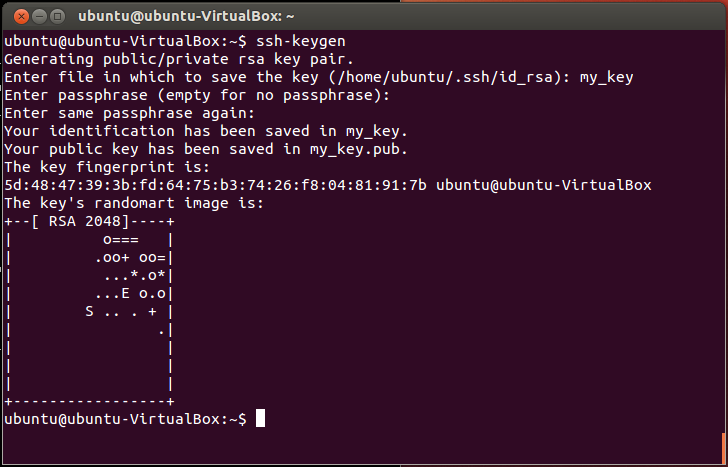
How to generate private/public SSH key pairs in Linux/macOS
To create a private/public key pair for your Linux environment, you can utilize the ‘ssh-keygen’ tool which is a command-line utility. Simply execute the ‘ssh-keygen‘ command from your terminal to generate your SSH private/public key pair.
Disable SSH root login on server
For security reasons, it’s recommended to disable root login and use a regular account and ‘su –‘ command to switch to the root user.
Important: Make sure that you add an account that can gain root access before actually disabling root login.
Disable password-based logins
If you’re using keys for authentication, consider disabling password authentication on the server. This adds another layer of protection against brute force attacks.
To disable password logins for SSH:
1 – Log into the remote server
Use an SSH command or a client like Putty to log in:
ssh root@server-ip-here2 – Create a new user account
On a Linux based system, use the following command to create a new user named ‘user’:
useradd -m -s /bin/bash userThen, set the user’s password using the passwd command:
passwd userAdd user to sudo (Ubuntu/Debian) group. If you are using a CentOS/RHEL/Fedora Linux add users to the wheel supplementary/secondary group:
usermod -aG sudo user3 – Install SSH keys on a remote machine
Create the key pair:
ssh-keygen -t rsaInstall the public key in remote server using the ssh-copy-id command as follows:
ssh-copy-id -i $HOME/.ssh/id_rsa.pub user@server-ip-hereImportant note: Do not move private key pairs onto the server. As a best practice, generate different key pairs for each computer you want to connect with. This will make it easy to delete public keys for each environment from the server in the event of a compromise.
4 – Disable root login and password based login
Log in into the server using the newly created user:
ssh user@server-ip-hereEdit the /etc/ssh/sshd_config file with your favorite file editor:
sudo nano /etc/ssh/sshd_configFind and add or edit the following entries:
- ChallengeResponseAuthentication – set to ‘no‘
- PasswordAuthentication – set to ‘no‘
- UsePAM – set to ‘no‘
- PermitRootLogin – set to ‘no‘
Save and close the file. Now, reload or restart the SSH server on Linux:
/etc/init.d/ssh reload5 – Verify access restrictions
Try to log in as root:
ssh root@server-ip-hereYou should see “Permission denied (publickey).”
Next, try to login with password only:
ssh user@server-ip-here -o PubkeyAuthentication=noYou should see “Permission denied (publickey).”
Finally, check all settings using the following command:
sudo sshd -T | grep -E -i 'ChallengeResponseAuthentication|PasswordAuthentication|UsePAM|PermitRootLogin'Please ensure you have created a regular user account and granted that user permission to gain root-level access via the ‘su‘ or ‘sudo‘ commands before disabling root login. Always remember to restart or reload the SSHD after editing the file.
Restrict SSH access using iptables
iptables, a Linux utility that’s included in most Linux distributions and can be used to set firewall rules that restrict or permit traffic based on IP address, port, or network protocol. You can use it to define rules that restrict incoming SSH traffic to a particular IP address or subnet, thereby enhancing your server security.
Blocking port 22, which is used the default used for SSH connections, can help prevent unauthorized access and even mitigate DDoS attacks. However, it’s essential to ensure that you don’t accidentally block your own SSH traffic in the process!
Here’s a quick example of how you can use iptables to restrict incoming SSH traffic, allowing only a specific IP address or subnet to access it.
- Replace ‘123.456.78.90‘ with the IP address you want to whitelist in the following command. If you’re using a subnet, it might look something like ‘10.10.10.0/24‘:
sudo iptables -A INPUT -p tcp -s 123.456.78.90 --dport 22 -j ACCEPT- Save the iptables rules to ensure they persist after a system reboot:
sudo iptables-saveTo view all iptables rules, use the `iptables -L` command. You can add ‘-v‘ for more detailed information and ‘-n‘ to display the output in numerical format.
If you want to clear all iptables rules and start from scratch, use the `iptables -F` command. This is particularly helpful if you’re unsure whether everything is configured correctly.
Benefits to using SSH
SSH is a powerful tool and an essential part of any website administrator’s toolkit. It allows for secure communication and data transfer over unsecured networks, providing a safe environment for you to manage your website and server. By understanding its workings and implementing best practices, you can ensure your server is well-protected and your data remains confidential.
It’s is crucial to remember that security is an ongoing process. Regular updates, website monitoring, and timely response to potential threats are necessary to maintain a secure server environment. By staying vigilant and educated about the latest security practices, you can effectively combat potential threats and ensure your website remains safe and secure.
At Sucuri, we are committed to providing you with comprehensive security solutions and the necessary knowledge to protect your website from threats. Whether you need assistance with malware removal, virtual patching, or ongoing website security, our team of experts is ready to help!