There is often a lot of discussion around locking down access to WP-ADMIN and WP-Login.php, specially around restricting it by IP. The issues and retort that often comes up is, “but what if I have a dynamic IP?” Right away the response from folks is, “oh, well then this won’t work for me.” It didn’t click at the time, but then it hit us, that doesn’t make any sense.
This post will teach you how you can lock down access to WP-ADMIN and WP-Login.php by domain name, instead of by IP. Giving you the same level of protection that you would expect if restricting by IP.
Using .HTACCESS
The first place you will start is inevitably .HTACCESS. The basic commands you insert are the following:
Lock Down Log In Page
This is often dropped in the .HTACCESS file at the root of your install. This small snippet is often what you would write:
#Secure Access to WP-LOGIN.PHP by IP
<Files wp-login.php>
Order Deny, Allow
Deny from All
Allow from [Your IP]
</Files>
One very small change and we’re off to the races with domain names in the place of IP:
#Secure Access to WP-LOGIN.PHP by Domain Name
<Files wp-login.php>
Order Deny, Allow
Deny from All
Allow from [Your Domain Name]
</Files>
Yes, a domain name, don’t worry it’ll make more sense as we go through this post.
Lock Down WP-ADMIN Access
The key here is to place this .htaccess inside the WP-ADMIN directory. This small snippet is often what you would write:
# Secure Access to WP-ADMIN by IP
<FilesMatch “.*”>
Order Deny, Allow
Deny from All
Allow from [Your IP]
</FilesMatch>
One very small change and we’re off to the races with domain names in the place of IP:
#Secure Accesss to WP-ADMIN by Domain Name
<FilesMatch “.*”>
Order Deny, Allow
Deny from All
Allow from [Your Domain Name]
</FilesMatch>
Yes, a domain name, don’t worry it’ll make more sense as we go through this post.
What do you mean Domain Name?
So this is where it gets fun and we have not heard many people chat or writ about it in this community. As we know, a domain name is nothing more than a human readable format for an IP, which is what DNS servers use to map out everything and anything that touches the internet. So the idea is a simple…
Use a domain name to identify with your local machine. But how is this done you ask. Simple. You use a service that binds a domain name with the IP on your local environment. Uh…
Using a Dynamic DNS Manager
If you’re still scratching your head, don’t fret, we’re going to walk you through the process here so that you don’t have to give it my thought.
This is what you have to do…
Step 1. Sign up with a Dynamic DNS Manager
Again, nothing to be concerned with there, you’re not looking at spending $100’s. There are actually a number of free services available to you, they include:
The rest of this post will focus on Afraid.org, mainly because the name is cool and it works very well. Please, don’t be weary of the presentation of the site, their strong suit obviously is not user experience or branding, but that’s ok, because it works.
You can sign up by following this link: http://freedns.afraid.org/signup/
Once you’re logged in, you’ll see the following:

Once sign up you’ll have to wait for the verification email before you can commence using the system.
Step 2. Configure Your Domain
Once you get the verification email, you can follow the link it provides and open a new session. The new page will have a link in the middle that says Add a subdomain.
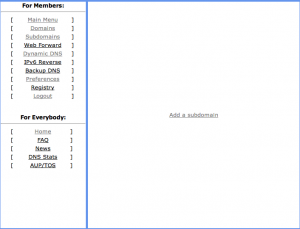
Go ahead and Add a subdomain.
The interface it presents you with is pretty straight forward.
The three areas you want to focus on include:
- Subdomain
- Domain
- Destination
You really don’t need to understand this, but what its doing is giving you a free subdomain on any one of the available public domains (i.e., the domains in the drop down list).
So from this example I have selected the following:
- Subdomain – testsubdomain
- Domain – Mooo.com
- Destination – 1.1.1.1
It should look something like this:
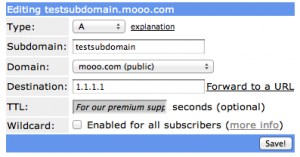
Don’t worry about placing too much emphasis on the Destination. I just set it at 1.1.1.1 because it’ll be updated later my your machine. In short, this is the IP that gets applied to the domain.
In case you didn’t catch it, my new domain is testsubdomain.mooo.com.
Once you have that, click Save.
Step 3. Configure with your Local Machine
This is by far the easiest step, although all the steps have been simple.
Simple click on Dynamic DNS in the left hand table of contents. Your screen should look something like this:
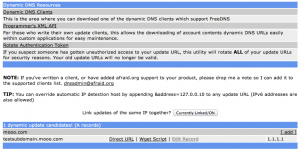
Once here, you have a couple of options, but the easiest once I like is using the Direct URL option.
When you click it, it’ll not open in a new window so be sure to use command + left click or control + click so that it opens in a new window.
Doing that then takes the IP of your local machine and applies it to the domain. So if your local IP is 173.56.201.45, the IP of the domain now becomes 173.56.201.45. This is key if you think back to the .htaccess configuration changes recommended above.
Step 4. Save URL
Might go without saying, but be sure to save the Direct URL link.
You will use this link every time your local IP changes.
Step 5. Update .HTACCESS
Now that you have now set up a domain to correspond with your machine, it’s on you to go back into your code editor and update it to filter not by IP, but by domain.
So looking at the recommendations above, they would now look something like the following:
Protecting wp-login.php:
#Secure Access to WP-LOGIN.PHP by Domain Name
<Files wp-login.php>
Order Deny, Allow
Deny from All
Allow from testsubdomain.mooo.com
</Files>
Protecting WP-ADMIN Directory:
#Secure Accesss to WP-ADMIN by Domain Name
<FilesMatch “.*”>
Order Deny, Allow
Deny from All
Allow from testsubdomain.mooo.com
</FilesMatch>
Couple Important Take-Aways
First, this is a really easy way to save money, better secure access to your administrator panel and better work with dynamic IP’s.
Second, this will work with any machine you have. If you are like me and have several machines this is key. I have a desktop that I use at home and one that I travel with and several others that I test on. This gives me the flexibility to be as mobile as I need to be. Whether in Canada, US or Brazil, I am always able to access my information by updating the IP for the domain.
Third, this now becomes as crucial a piece of information as your username and password. Do not share your link and / or domain name. Treat your access to the DNS Manager as important, ensure you’re following good practice for creating and managing your access credentials.
Fourth, although I talk specifically to WordPress, this is something that can be applied to a wide array of authentication needs. It can be used internally to restrict FTP, SFTP, SSH access and it can also be used on any number of available CMS’s.
As always, feel free to contact us or comment if you have any questions or concerns. You can always email us at info@sucuri.net


4 comments
Hello Tony,
Thanks for the post… In regards to IP protecting with a static IP wouldn’t dropping the following in the .htaccess of the WP-Admin folder be enough?
Order Deny, Allow
Deny from All
Allow from [Your IP]
I’m probably missing something, but when I test logging in with only this code snippet installed, (notice I didn’t include “” either), I am unable to access mysite/wp-congif.php & mysite/wp-admin. So the IP security appears to work as I intended it. Again, I must be missing something…
Would appreciate your insight. Thanks.
Hi Tony,
If the website is using CloudFlare or load balancer, what would be the modified code for this method?
The code below was given for allowing fixed IP addresses. How would this be modified to use testsubdomain.mooo.com using your example above?
# add the following lines to /wordpress/.htaccess
SetEnvIf X-FORWARDED-FOR 93.75.252.219 allowedip
SetEnvIf X-FORWARDED-FOR 110.170.50.32 allowedip
order deny,allow
deny from all
allow from env=allowedip
# add the following lines to /wordpress/wp-admin/.htaccess
SetEnvIf X-FORWARDED-FOR 93.75.252.219 allowedip
SetEnvIf X-FORWARDED-FOR 110.170.50.32 allowedip
order deny,allow
deny from all
allow from env=allowedip
Many thanks.
I think the option Tony brought up is I’m the case you have a dynamic ip because the domain will just take on whatever your machines ip is.
Broken images!!!
Comments are closed.