This post provides a brief overview of how to manually remove server-side cryptominers and other types of Binary-Process-Cron malware from a server. Unlike browser-based JavaScript cryptominers that have been injected into a web page, a binary server-level cryptominer abuses server resources without affecting the computers or mobile devices of site visitors.
We will cover the attributes of these sever-level infections to provide a basic understanding of their form and function, as well as a couple of different methods of removal. This article is intended for those who are familiar with the Linux Command Line, have complete access to their server, and like a small challenge while learning in the process.
Introduction
You’ve recently noticed that your server is constantly running at maximum capacity. You’ve tried several things so far to remedy the problem, and haven’t had any luck. You tried restarting the server, only to find the server back at maximum a few moments later. You dug a little deeper, and found a suspicious looking file without an extension – which after you delete it, reappears in seconds. No matter what you seem to do, nothing seems to fix the problem permanently.
Chances are high that your server has been infected with a cryptocurrency miner or some other form of so-called “Binary-Process-Cron” malware.
While they come in many variants, the signs of “high-CPU” usage and reappearing files on your server are a pretty clear giveaway. Once you know how these little demons work, you’ll understand why they are so difficult to get rid of.
What Are “Binary-Process-Cron” Infections?
As you can probably guess, these types of infections use a combination of a binary file – typically an Executable Linux File (or ELF for short), processes, and a cronjob to keep themselves alive as long as possible.
I like to think of them as a Hydra – cut off a head and it just ends up growing back, no matter how many times you try:
- If you kill the processes, the cron will start them again.
- If you delete the file, the process will create it again.
- If you delete the cron job WHILE the process is running, it will recreate the cron job.
- If you try to kill the running PHP processes in cPanel, it will do absolutely nothing, because these are not PHP processes that are running (more on this later).
However, these infections are not as invincible as they would like you to believe. We will show you how to remove these quickly, should you come across one in the future.
Get’em Outta Here! – Cryptominer Removal
Before you even start, you need to make sure that you have SSH access to your server, preferably with either root or adequate permissions to:
- View/kill processes
- Remove files
- Access the crontab
- Disable cageFS (if applicable to your server, more on this later)
Caution: If these instructions look daunting, we do not recommend trying this alone. Feel free to reach out to us for our services and we’ll be happy to help.
Depending on your hosting company, you may not have access to do these steps. If this is the case, you will need to contact your hosting company for assistance.
As a general rule of thumb:
- If you are on a “Shared” hosting platform, you will most likely NOT HAVE proper access.
- If you are on a “Dedicated/Cloud/VPS” server, then you most likely WILL HAVE access.
For now, let’s assume that you do have the requisite access. Now, let’s log into the server via SSH.
***WARNING: YOU ARE ENTERING ROOT MODE – PLEASE BE RESPONSIBLE***
Once signed into the server, the first two commands we are going to run are the following:
sudo screen
This will give us the root access we need to make things easier – again, please be careful. The other reason we do this is so you can reattach to the screen session if you get disconnected from the server while working on it.
Now run:
# top -u USERNAME
or just
# top
Which should show you something along the lines of this:
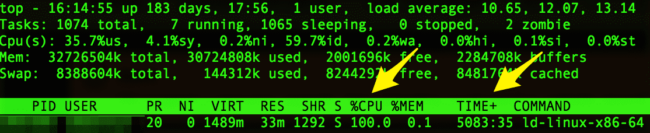
In other cases, you may also see a process list like this:
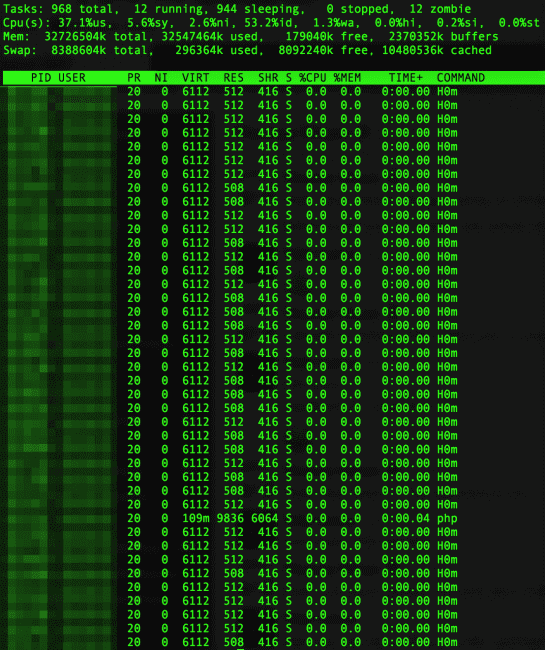
So, obviously in the latter case, we don’t want to try kill each process individually as this would be a nightmare. However, we can see that they all have the same command-name of H0m, so this makes our job a little bit easier.
Before we continue, let’s take a quick look at the crontabs for our username to make sure we don’t have other important or malicious cron jobs running.
For this, we simply just need to enter the following:
# crontab -u USERNAME -l
Or if you want to check all users on a server, you can run:
# for user in $(cut -f1 -d: /etc/passwd); do echo $user; crontab -u $user -l; done
If you have legitimate cron jobs in the crontab, you will want to copy these so that you can add them back in later. Either way, you will typically see that a cron job will have the same name in it as the process and the file. In this case, that would be “H0m”. Okay, cleanup time!
Cleanup Method 1 (Default)
This command will work for most platforms.
# for pid in $(ps -ef | grep "PROCESSNAME" | awk '{print $2}'); do kill -9 $pid; done; crontab -u USERNAME -r; rm -f ./FILENAMEExample:
# for pid in $(ps -ef | grep "h0m" | awk '{print $2}'); do kill -9 $pid; done; crontab -u mainuser1 -r; rm -f ./h0m
This should work fine in most cases, but you have to be very careful with these types of commands because they will nuke ALL matching processes for ALL users. While this is probably fine for something like “h0m”, if the process name is “perl”, that is something you wouldn’t want to kill for everyone.
This should clear things up immediately. All you would need to do is replace your copied cronjobs (if you had any) back into your crontab using:
# crontab -u USERNAME -e
Cleanup Method 2 (CloudLinux)
Sometimes, the processes just absolutely refuse to die no matter how polite or coercive you are.
“Honey, get me the big hammer!”
There is always a better way. In my personal experience, this method tends to be much more consistently effective, but is strictly limited by your hosting platform. If they use CloudLinux, you’re in luck.
You can quickly check if this method will work for you by typing the following command:
# cldetect
This command doesn’t do anything on it’s own, but if you see a list of different options, you’re good to go!
However, if you see something like:
# -bash: cldetect: command not found
Then this method will not work for you.
The trick here is to disable the “cageFS” for that specific user, which will force stop all their active processes. Furthermore, while it’s disabled, it will prevent immediate re-execution, giving us plenty of time to remove the crontab and the files.
Long story short, here’s what you do.
***WARNING: BE VERY PRECISE WITH THESE COMMANDS***
Enter the following command in SSH:
# cagefsctl --disable USERNAME && crontab -u USERNAME -r && rm -f ./FILENAME
This will nuke every matching open process the user has, delete the cron and the file – and it should be gone for good.
Once that is complete, simply run:
# cagefsctl --enable USERNAME
Go ahead and open up TOP again, and leave it open for about 15 mins while you enjoy the fruits of your labor. Just keep an eye on it, but if everything went according to plan, you should not see any new malicious processes starting.
And that’s it really! Just make sure that you EXIT out of the screen session (literally type “exit” in your screen window). You can then exit the SSH connection, otherwise the screen will stay open until the server is restarted.
Hope this helps everyone hunt down those nasty server-side cryptominers.
And don’t forget to:
- Change all admin passwords associated with the site (FTP, admin panel, cpanel, etc).
- Be sure to keep all software (plugins, theme, CMS) up to date.
- Run an antivirus scan on your laptop/workstation.
- Put your website behind a firewall.
- Remove any old/backup versions of the website on the server.
Tech Section
Now, if you’re a bit of a nerd like me, you can check out the following links for a deeper analysis of these files and a very shallow glimpse of what they are doing.
First and foremost, these files tend to be difficult to detect because they are often randomly compiled (every file is different/unique). Services like VirusTotal often don’t properly identify these as malicious files, as you can see here: https://www.virustotal.com/#/file/ee72b7faaa2618860c96e90768ba8afd39757c4e0614732927b4fbd67a4283b9/detection
However, if we look at the Behavior tab and click on the Tencent HABO > Detailed Report, we can see the following:

This URL was created by PasteBin User “miner4ek” (strongly suggesting that it’s a miner) on Feb 28, 2018, and has been queried 271,778 times since then.
Even though the simple contents of the file aren’t inherently suspicious, the name of the author certainly is. We can also see that it’s doing something with the crontabs, adding another level of suspicion.
Unfortunately, that isn’t exactly proof positive, which means we have to get our hands dirty on the command line. Here are some examples you can try yourself.
ELF read of an example binary file: https://pastebin.com/RLwmpugW
We can use simple commands like the following to identify what kind of file we are dealing with:
# file FILENAME
xmcc: ELF 64-bit LSB shared object, x86-64, version 1 (SYSV), dynamically linked, stripped
or
readelf -a FILENAME
(see link above)
These don’t provide us much info, but they at least help us identify that these are ELFs (Executable Linux Files). Usually, nothing on a web server should be using files like this – at least not in the webroot – so we can throw up a Yellow Card, and continue digging deeper.
Another great option is strings, which will find the printable strings in a object, or other binary files:
# strings FILENAME
The output of the command shows that there are several suspicious behaviors and keywords like the text “minr_here.txt” and callouts to suspicious URLs like “hxxp://91[.]215[.] 153[.]55/novys/comm.php?suid=”. These are just a couple examples, but there are several other suspicious behaviors. Take a moment to see how many you can find.
That said, while many of these are highly indicative of malicious behavior, let’s pretend we’re not satisfied yet.
Highly-abriged hex dump of an example binary file: https://pastebin.com/R7epbXVK
If you check the link, you can see that a vast majority of the hex-dump is just garbled nonsense and seemingly random characters… However, there are often human-readable areas scattered throughout. By examining these areas, we can begin to glean some insight on what this file is doing behind the scenes.
For example, on lines 87-95 we can see the following:
(87)000e8b90 73 74 72 61 74 75 6d 2b 74 63 70 3a 2f 2f 00 2e |stratum+tcp://..|
(88)000e8ba0 6d 69 6e 65 72 67 61 74 65 2e 63 6f 6d 00 2e 6e |minergate.com..n|
(89)000e8bb0 69 63 65 68 61 73 68 2e 63 6f 6d 00 00 00 00 00 |icehash.com.....|
(90)000e8bc0 54 72 79 20 22 78 6d 72 69 67 22 20 2d 2d 68 65 |Try "xmrig" --he|
(91)000e8bd0 6c 70 27 20 66 6f 72 20 6d 6f 72 65 20 69 6e 66 |lp' for more inf|
(92)000e8be0 6f 72 6d 61 74 69 6f 6e 2e 0a 00 00 00 00 00 00 |ormation........|
(93)000e8bf0 58 4d 52 69 67 20 32 2e 34 2e 34 0a 20 62 75 69 |XMRig 2.4.4. bui|
(94)000e8c00 6c 74 20 6f 6e 20 4a 61 6e 20 31 36 20 32 30 31 |lt on Jan 16 201|
(95)000e8c10 38 20 77 69 74 68 20 47 43 43 00 00 00 00 00 00 |8 with GCC......|
“Minergate[.]com” and “nicehash[.]com” immediately stand out as suspicious, but our absolute confirmation is the fact that it is using “xmrig”. A quick Google search will show that XMRig is a high performance Monero (XMR) CPU miner, thus, we can almost guarantee this is malicious, especially since it was likely installed without the server administrators consent.
If we still aren’t completely 100% satisfied, we can also examine the process itself.
Complete process dump: https://pastebin.com/1FWbCeHW
Important Note:
Using commands like ‘# strace’ and ‘# ptrace’ will actually execute the file, causing it to run. However, if your process is still running you can perform something like the following command to completely dump all of the information about a process. Whether this information is important to you or not, is up to you, but it could be useful if you are trying to identify whether the process is malicious or not.
To execute the following command, you will need to know the PID (Process ID), and replace the number after “proc” with that PID. Here’s an example:
# find /proc/7777 -type f | xargs -I % sh -c 'echo % >> /output.txt; cat % >> /output.txt'
This information is probably only interesting to a select group of individuals, but it’s educational either way so I decided to include it in the article.
Also, just remember that we’re always here to help. Feel free to holler if you have any additional questions, and we’ll be happy to assist you however we can.
That’s it for now! Hope everyone found something useful.
HAPPY HUNTING!