We released a new guide in 2016 that provides better instructions on how to clean a hacked WordPress site using the free WordPress security plugin.
Guide on How to Clean a Hacked WordPress Site
We often write posts that give you advice and recommendations about how to harden your websites, yet have only recently begun to advise on ways to navigate your backend and remove infections via terminal. But what about all the basics?
That’s what I want to cover in this post. All those things that you should know when trying to remove web malware from your site. Alternatively, if you’re already hacked, you can enlist Sucuri to clean your website regardless of CMS.
Cleaning Basics
When working to clean your site there are a number of things you should know. I’ll wrap it into four key ones:
- Use Live Scanners
- Default WP File Structure
- File Permissions
- Disabling Plugins
1. Use Live Scanners
Contrary to popular belief, utilizing web-based scanners are a necessity in this day and age. False positives are an acceptable risk in today’s fight against web malware – much better than false negatives! In other words, it is better to flag something for review than to miss a possible infection. This balance is an important factor in any website scanner you use.
Of course, there aren’t many live scanners out there on the market that are truly free and willing to give you a report without asking to register or make a payment of some kind:
Disclaimer: The scanner is not 100% accurate, and furthermore no malware scanning product should ever boast 100% certainty. It is just not possible in this domain. If it were, there wouldn’t be any competitors or service providers.
2. Default WP File Structure
What most don’t understand is that WordPress is organized by default. This is an important point to make. In every install, there are core directories and files.
This is what a clean install looks like:
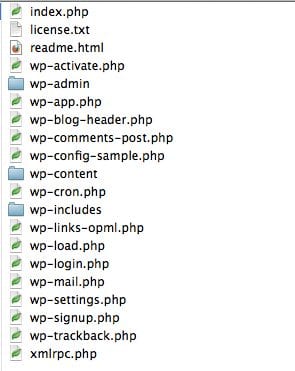
You should become familiar with how your website file system looks and pay attention to changes. One option is to do your own integrity checks by comparing your base install to the core install. As you might imagine, there is a way to do this via terminal. Here is an example:
$ diff -r /Documents/WordPress/wp-includes /public_html/happysite.com/wp-includes
Why is this important?
File integrity monitoring is important because, in more cases than most, folks realize you’ll want to replace your core install when something goes wrong.
The reasoning is simple. From what we see in a lot of infections, once access is gained to the environment, the backdoor payloads are pushed into the core install directories. This allows bad actors to gain access to your environment directly. If you don’t have the ability to effectively scan every directory for backdoors, then it’s good practice to replace the two core directories wp-admin and wp-includes any time you suspect an issue.
Please note the emphasis on replace, not update. This is important because an update will simply overwrite the existing files – it will not purge the directory. This means if a backdoor resides in a non-root file the update won’t clear the issue.
Tip: SEO spam is notorious for this.
3. File Permissions
The ever important file permissions. The WordPress.org Codex offers some very good advice on specific permissions for WordPress installs. You can find a good article on the Codex: Changing File Permissions
The biggest takeaway:
- Directories: 755
- Files: 644
There is a simple method to apply the changes via terminal:
Directories:
find [path to install] -type d -exec chmod 755 {} ;Files:
Find [path to install] -type f -exec chmod 644 {} ;
But what about the non-terminal types? No problem! Using your favorite FTP client you should be able to do this easily. In this instance I’ll show you in FileZilla. While I wouldn’t recommend storing the credentials in the client, I’d recommend FileZilla to anyone trying to work in FTP.
What I particularly like about it is you can use this client across the three most common platforms (e.g., MAC, Windows, Linux)
To change the permissions for all directories it’s easy:
- Log into your server and click on the directory for your web-files. It can be: www, public_html, htdocs, httpdocs, etc…
- Once at the directory, right-click and click on File Permissions….
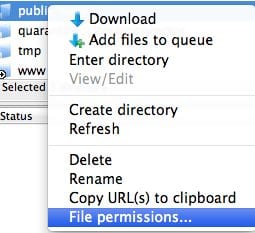
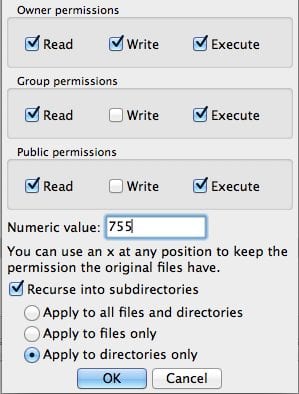
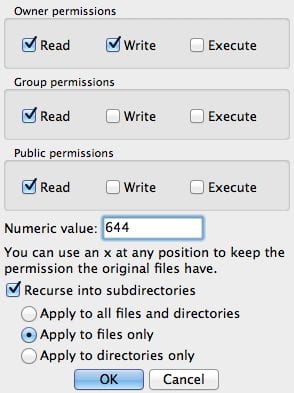
- On the next screen, you can type in 755 where it says Numeric value.
- Be sure to also click Recurse into subdirectories and select Apply to directories only.
- This will apply the 755 permission to all directories within the web directory
The good news is that the file permissions are just as easy. Simply follow the same steps as above. This time though you’ll type 644 and select Apply to files only.
As you can see, there is no real secret here. Simply follow the recommendations you are given.
Another important note. In Filezilla you can easily see the permission of your directories and files by looking to the far right column of the directory or file listing, like the screenshot below:
4. Disable Plugins
Here is another good tip. When using a scanner, if you continue to struggle with identifying the location of the infection, one very common place to look is in the plugins directory.
What most people don’t realize is that you have the option to disable the plugins directory. Don’t be afraid of “disable”. It simply means you can’t use the plugins. One very easy way to do this is to rename the directory:
Example: plugins -> plugins.backup
This will kill all your plugins rendering them useless to your website. The point of doing this is to see if the infection is tied to the plugins. If it is, you’ll see that the live scanners will show clean when you rescan your website. If this is the case, another very good trick is to narrow down the infection further by disabling one plugin at a time.
Yes, this works and it’s very easy to do for novices.
Note: Renaming is not going to hurt your site. When you rename it back to its default name, the site will be fully functional again.
If you disable plugins and the infection is still present, then you know it’s due to one of these three things: core files, theme files, or database. If you followed the steps in Tips & Tricks 2 then you know it’s in either the themes or the database.
This post is not meant to be a technical overview of how to remove website malware, but instead to help diagnose the location of infections, which in turn helps you locate and remove the infection. It’s fundamentally a different approach. Believe it or not, the most novice of users would be able to use these techniques to quickly narrow down infections.
If you have any questions please contact us at info@sucuri.net.







19 comments
Thank you so much for this–I use your free scanner every week–wish I could afford to easily pay for Sucuri for all the sites I work on. As it is, I’ve purchased it for one of my sites as a thank you to you. Have asked our company president to recommend to our customers that they buy it. & thanks for the technical tips–have put some into place.
Do the use of the
live scanner requires internet connection to scan and update?
Thank you so much for this article. This is really interesting! 🙂 I shall retweet this 🙂
Thank you for this post, It was a great read which was extremely helpful.
Hi, My wordpress website is not yet live after removed virus threats. can i know the reason?
Need help.
I have lot of experience in removing any malware from websites. i have clean already more than 300 websites.
Thank You for this great post, this is really helpful to find out virus and remove it. I also use antiviruses like avast, avg, optimo defender, etc to detect it and they also helpful in other way. Really Thank You.
This will surely help me . I have been getting some emails that makes you wondder whether all the WordPress Antispam plugins don’t work. It has to be one of these issues I will try these steps.
really useful article thank you for the detailed insight wordfence helped me a lot to clean up the site along with your tips.
Extremely useful. Thanks a lot to share
Thanks Tony,
Wish I would have read this before hand, $299.00 to clean my malware
Comments are closed.